


The search for the perfect youtube camera is a journey every creator knows well. It’s a frustrating cycle of compromises that defines your entire production workflow.
You start with a basic webcam. It's plug-and-play, but the quality is grainy, the low-light performance is terrible, and you have zero creative control.1 You quickly realize your content looks amateurish, and that's a death sentence on a platform where 91% of marketers agree that video quality is key to professionalism.1
So, you look at upgrading. The "pro" creators tell you to get a DSLR or mirrorless camera.2 This is the "Creator's Dilemma." You've just entered a world of pain, complexity, and hidden costs. Suddenly, to get one video feed into your computer, you need:
- The camera body ($600+)
- A specific lens ($300+)
- An HDMI capture card ($100+)
- A "dummy battery" for continuous power ($40+)
- A confusing mess of cables and software drivers 3
You’ve spent over $1,000 and your desk is a fragile nest of wires, all to solve a problem that should be simple. Finding a good youtube camera shouldn't require an engineering degree.
This is exactly why a new category of device has emerged, purpose-built to solve this exact problem: the dedicated streaming camera.4 These hybrid devices bridge the massive gap between webcam simplicity and DSLR quality.
And at the forefront of this revolution is the NearStream VM20.
This isn't just another camera. It's an entire, scalable production ecosystem packed into one device. It is, from day one, arguably the best starting youtube camera a creator can buy, because it’s the only camera you’ll need as you grow from a beginner to a full-fledged multi-camera production studio.5
What is the NearStream VM20? (And Why Isn't it Just a Webcam?)
The VM20 is frequently called a "productivity cam" or a "DSLR-level wired streaming camera".6 This is because it was designed from the ground up to solve the workflow problems of content creators. It's not a photography camera forced to do video; it's a dedicated studio tool.
Let's break down the hardware that makes it superior to any webcam and most beginner DSLR setups.
Core Hardware That Beats Any Webcam
- Pro-Grade 4K Sensor: The VM20 delivers a crisp 4K image at 30fps.9 It's powered by a high-quality 5MP 1/2.8" CMOS sensor 9, often identified as a Sony Starvis sensor.11 This is a sensor brand famous for its exceptional low-light performance. Where a webcam produces a noisy, dark-gray mess, the VM20 delivers a clear, detailed image even in a softly lit room.12
- The "Magic" Lens: 10x Optical Zoom: This is the single biggest hardware advantage. Your webcam has "digital zoom," which is just cropping the image and destroying the quality. The VM20 has a 10x optical zoom lens (part of a 40x hybrid zoom).9 This means the lens physically moves to get you 10 times closer with zero loss in quality. For a YouTuber, this is a creative game-changer.
- Built-in Professional Audio: The camera features a sophisticated 8-MEMS microphone array with built-in AI noise cancellation.9 This array captures 360-degree audio from up to 16 feet away, filtering out keyboard clicks and fan noise to deliver clear vocals.9 It also includes a 3.5mm audio input, giving you an instant, simple upgrade path to connect a lavalier or shotgun mic.9

The Connectivity That Makes it a "Forever" Camera
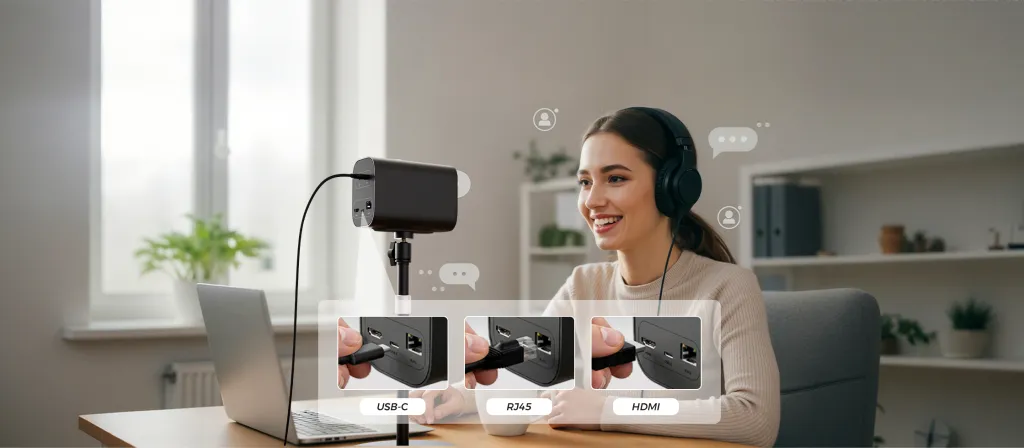
The true genius of the VM20 is its triple-output design. This is what enables it to be the best starting youtube camera and a professional youtube camera at the same time.9
- USB-C (The "Beginner" Port): The VM20 is a UVC (USB Video Class) device.16 This is a fancy way of saying when you plug it in, your computer instantly recognizes it as a high-end webcam. No drivers, no software, no hassle. It just works.16
- HDMI (The "Pro" Port): This is your upgrade path. The clean HDMI output allows the VM20 to connect directly to professional hardware, most importantly, a video switcher.9 This is the key to building a multi-camera setup, which we'll cover in detail.
- RJ45 (Ethernet): This is the "Advanced" port. It allows for RTSP streaming (you can stream directly to YouTube without a computer) and supports PoE (Power over Ethernet), letting you power and control the camera with a single network cable.9
You can start with just the USB-C cable and, as your channel grows, use the exact same camera in a professional broadcast studio by switching to the HDMI port.
The Single-Camera Workflow: How to Look Like a Pro with One Camera
This is the Level 1 setup, perfect for the solo YouTuber who wants to unbox their camera and be recording 4K video in under five minutes.
Software Setup: OBS & Plug-and-Play
Thanks to that UVC-compliant USB-C port, the software setup is stunningly simple.16 We'll use OBS Studio, the free and powerful standard for most creators.
- Connect Hardware: Mount your VM20 on a tripod 18 and connect it to your computer with the included USB-C cable.
- Add Video in OBS: Open OBS. In the "Sources" box, click the "+" button and select "Video Capture Device".17 Name it "VM20 Main."
- Select Device: In the new window, click the "Device" dropdown menu and select "NearStream VM20".17 Your 4K video feed will instantly appear.
- Add Audio in OBS: Click the "+" button in "Sources" again. Select "Audio Input Capture".17 Name it "VM20 Audio" and select "Microphone (NearStream USB VM20)" from the device list.15
That's it. You are now set up with 4K video and AI-noise-canceled audio.
The "Single-Cam, Multi-Cam" Trick with Presets
This is where the VM20 workflow demolishes any webcam. The included 360-degree RF remote control is your secret weapon for creating a dynamic show, even when you're a crew of one.
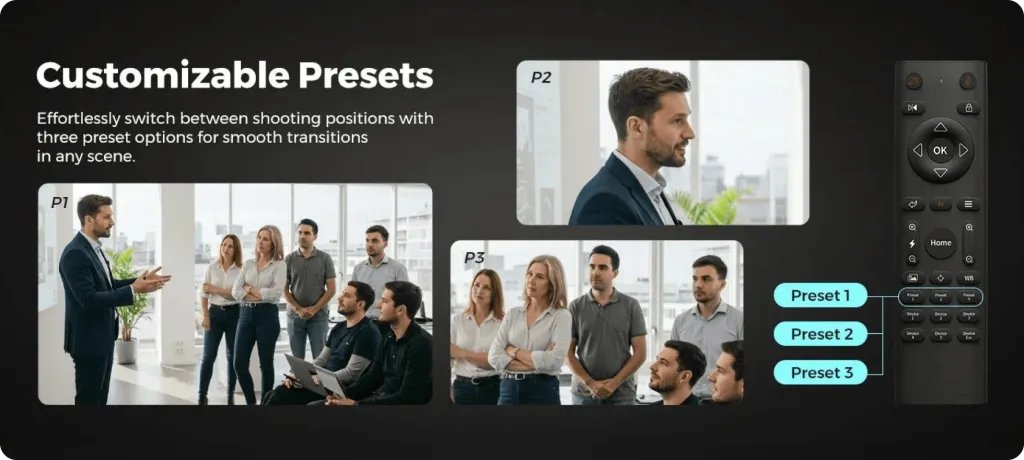
The remote allows you to set three customizable preset positions.9 Using the 10x optical zoom, you can create three unique, professional-looking shots and switch between them live with a single button press.
Here’s a practical example for a YouTube product reviewer:
- Preset 1: The Wide Shot: Frame your standard "talking head" shot, showing you and your desk. Aim the camera, then press and hold the "PRESET 1" button on the remote.13
- Preset 2: The Tight Shot: Use the remote's optical zoom to push in for a tight, expressive close-up on your face. Frame it perfectly. Press and hold "PRESET 2".13
- Preset 3: The Product Shot: Use the remote's zoom and pan/tilt buttons to aim the camera down at the product on your desk. Get a sharp, detailed top-down view.11 Press and hold "PRESET 3".
Now, as you're recording your video, you can talk to the camera (Preset 1), zoom in for emphasis (Preset 2), and instantly cut to a detailed product shot (Preset 3), all without stopping the recording or moving from your chair. This "super handy" feature single-handedly elevates your production value from a static "webcam video" to a dynamic, engaging "YouTube show".13
 The Multi-Camera YouTube Studio: One Remote to Rule Them All
This is the upgrade. Your channel is growing. You're doing interviews, podcasts, or complex tutorials and you need multiple angles. This is where the VM20 transitions from the best starting youtube camera to the best youtube camera, period.
Most creators believe this step requires three new cameras, three capture cards, and a tangle of USB cables that will inevitably overload their computer.20
The VM20 ecosystem is built to bypass this entire nightmare.
The "Secret" Feature: Controlling Three Cameras with One Remote
This is the advanced, professional workflow that the VM20 is designed for. Not only can you use the same remote to control your camera, but you can also use that one single remote to control multiple VM20 cameras.21
This feature, common in professional broadcast but almost unknown in the creator space, works by assigning each camera a unique IR (infrared) address. Here’s how you do it.
The Operation: How to Pair Your Cameras
- Set Up Your Cameras: Place your three VM20 cameras where you want them (e.g., "Main," "Guest," and "Overhead").
- Assign Camera 1: Point the remote only at your "Main" camera. Press a special key combination, typically [*]+[#]+[F1].22 A light on the camera will flash, confirming it is now assigned to "Camera 1."
- Assign Camera 2: Point the remote only at your "Guest" camera. Press the combination for address 2: [*]+[#]+[F2].22 It is now "Camera 2."
- Assign Camera 3: Point the remote only at your "Overhead" camera and press [*]+[#]+[F3].22 It is now "Camera 3."
The Workflow: How to Control Your Studio
Now, your single remote is a complete studio controller. On the remote are camera selection buttons (labeled "1," "2," "3," etc.).21
- Want to adjust your main camera? Press "1" on the remote. All other buttons (zoom, focus, pan, tilt) will only control Camera 1.
- Want to zoom in your guest's camera? Press "2." Now the zoom buttons only control Camera 2.
- Want to call up a preset on your overhead shot? Press "3," then press "PRESET 1."
You can sit at your desk and, with one hand, fluidly direct a three-camera shoot like a professional broadcast director. You can set and recall three different presets for each camera, giving you a total of nine unique shots available at the press of a button.9
Hardware vs. Software: Connecting Your Multi-Cam Rig
Having remote control is half the battle; getting the video feeds into your computer is the other. Here is the right way and the wrong way to do it.
- The WRONG Way (USB Overload): Do not try to plug three 4K USB cameras into your computer. Your computer's USB controller cannot handle that much data. You will face freezes, stuttering, and constant crashes.20
- The RIGHT Way (Hardware Switcher): This is the professional, reliable solution. The VM20s' HDMI ports are built for this.17
- Connect the HDMI output from all three VM20 cameras into a hardware video switcher, like the Blackmagic ATEM Mini.17
- The ATEM Mini processes all three video feeds, mixing them into one final "Program" feed.
- Connect the ATEM Mini's USB output to your computer.25
- Your computer (and OBS) sees the entire three-camera studio as one single, simple webcam.25
This setup is infinitely more stable because the ATEM switcher is doing all the heavy lifting, not your computer. You use the remote to aim the cameras and the switcher to cut between them. This is how professional live shows are run.
Solving the YouTube Recording Workflow (Hardware & Software)
There is one critical workflow component we must discuss: recording.
A common mistake is assuming every youtube camera records internally. The NearStream VM20 is a dedicated streaming and productivity camera; it does not have an internal SD card slot.8 This is not a flaw; it's a deliberate design choice that moves the "point of failure" away from the camera and gives you more robust, professional options.
You have two primary ways to record your content.
Solution 1: Software Recording (The Free Method)
For the Level 1 (single-camera) setup, this is the easiest path. Your computer will be your recording device. In OBS Studio, right next to the "Start Streaming" button, there is a "Start Recording" button.19 When you press this, OBS records your final video and audio mix directly to your hard drive. This works perfectly, but it puts a heavy strain on your computer, which is simultaneously processing video, streaming, and recording.27
Solution 2: Hardware Recording (The Professional Method)
This is the bulletproof solution. For any serious YouTuber, especially one doing long-form content or client work, you never want your stream and your recording to be the same file. If your stream crashes, you lose everything.
The pro workflow uses a dedicated, external video and recorder.1
In this setup, you connect the HDMI output from your VM20 (or the "Program Out" HDMI from your ATEM Mini switcher) to a hardware recorder like an Atomos Ninja 29 or a Blackmagic HyperDeck.30 This device does one job and does it perfectly: it records a broadcast-quality master file to its own hard drive.32
This provides redundancy. Your computer can crash, OBS can freeze, your internet can go down… and it doesn't matter. Your perfect 4K master recording is safe and sound on your external recorder.
Conclusion: The Best YouTube Camera is an Ecosystem, Not a Gadget
For years, creators have been stuck in a frustrating debate: a simple-but-low-quality webcam or a high-quality-but-complex DSLR.1 A good youtube camera isn't just about a nice sensor; it's about a workflow that gets out of your way and lets you create.
The NearStream VM20 is the definitive answer. It is the best youtube camera for a modern creator because it is an entire, scalable ecosystem in one box.
- Day 1: It's the best starting youtube camera—a plug-and-play 4K webcam with 10x optical zoom and a remote that makes you look like a pro.
- Year 1: It's the heart of a professional, multi-camera studio, using its HDMI port and advanced remote features to build a setup that grows with your ambitions.
It eliminates the "messy middle" and delivers professional quality at every stage. Stop "faffing about with fiddly gear" 8 and cobbling together systems that were never meant to work together.
Ready to build the YouTube studio your content deserves? Learn more about the NearStream VM20 today.
FAQ: Your Questions About the VM20 for YouTube
1. Can I record videos directly to an SD card with the VM20?
No. The VM20 is a dedicated streaming and studio camera and does not have an SD card slot.8 It is designed to output its high-quality video to a computer via USB-C or to a dedicated hardware recorder/switcher via HDMI. You must use software on your computer (like OBS Studio) 19 or an external recorder to capture your video.1
2. Do I need a capture card to use the VM20?
For a single-camera setup, no. The VM20 connects via USB-C and is a plug-and-play UVC (USB Video Class) device.16 Your computer and software like OBS, Zoom, or Teams will instantly see it as a high-quality webcam.16 You only need a capture card or a video switcher (which has a capture card built-in) if you want to use the professional HDMI output, which is the recommended method for multi-camera setups.3
3. How is this better for YouTube than a Sony ZV-E10 or a DSLR?
Simplicity, cost, and workflow. A mirrorless camera like the Sony ZV-E10 4 requires you to buy a separate lens, a $100+ capture card, and a dummy battery for continuous power. The VM20 is an all-in-one solution. It delivers a 4K image, a built-in 10x optical zoom lens, and power/video all through a single USB-C cable.9 It's a complete "studio-in-a-box" without the complex, multi-part setup.
4. Is the built-in microphone good enough for YouTube videos?
The built-in 8-MEMS microphone array with AI noise cancellation is a significant upgrade over any webcam or built-in laptop mic.13 It's excellent for clear vocals on streams and video calls. For pro-level, polished YouTube videos, creators should always use a dedicated mic. The VM20 makes this easy by including a 3.5mm audio input, allowing you to plug a high-quality lavalier or shotgun mic directly into the camera.9
5. Can I really control three VM20s with just one remote?
Yes. This is an advanced feature designed for pro studios. By assigning each camera a unique IR address (e.g., "Camera 1", "Camera 2", "Camera 3") using a key combination, you can use the camera selection buttons on the single remote to choose which camera you are actively controlling. Once a camera is selected, all other remote functions (zoom, focus, pan, tilt, and presets) will apply only to that specific camera.21