


Basketball is one of the fastest sports to stream live. The ball moves from baseline to baseline in seconds, players cut through lanes, and the action rarely stays in one place. If you are a youth sports parent, a coach, or a solo streamer trying to broadcast games, you have probably already faced the two biggest frustrations: motion blur that turns a fast break into a smear, and a camera angle that only shows half the court. Finding the best video camera for sports is not just about resolution. It is about frame rate, field of view, and a setup simple enough that you can run it alone from the bleachers.
This guide walks you through exactly how to live stream a basketball game like a pro, from camera placement and frame-rate settings to audio and wireless workflow. By the end, you will know how to achieve full-court coverage, eliminate motion blur, and why an all-in-one wireless sports recording camera can replace an entire bag of cables and capture cards.

Why Basketball Streaming Is Harder Than It Looks
Unlike a podcast or a stationary presenter, basketball demands three things from your gear at once: wide coverage, fast shutter response, and reliable connectivity. A standard webcam or phone on a tripod fails because it was never designed for rapid lateral movement across a 94-foot court. You end up with cropped frames, blurry players, and viewers asking why they can only see the half-court line.
The real challenge is not the camera quality alone. It is the combination of positioning, frame rate, and transmission. Most first-time streamers focus only on resolution—4K sounds impressive—but if your stream is stuck at 24 fps with a narrow lens, the footage still feels choppy and cramped. For basketball streams that look professional, you need to optimize for speed and coverage first, then resolution.
Think about the way a broadcast NBA game looks. The camera stays wide enough to see passing lanes, the frame rate keeps the ball crisp during crossovers, and the audio captures sneaker squeaks and whistle blows without turning crowd noise into a muddy wall of sound. Replicating that at the youth level is absolutely possible, but it requires following a professional high school sports live streaming guide to make deliberate choices about gear and setup rather than just buying the highest-megapixel camera you can find.
What You Need Before You Hit "Go Live"
Before game day, gather the following basics:
- A sports recording camera with at least 1080p streaming output, 30 fps or higher, and a wide-angle lens (70 degrees or more)
- A sturdy tripod that can extend to 8–12 feet, or a secure bleacher mount
- Reliable gym Wi-Fi or a mobile hotspot with at least 5 Mbps upload speed
- A streaming platform account (YouTube, Facebook Live, or Twitch)
- Power backup: USB-C power bank or AC access near the camera position
- Optional: External microphone with a 3.5mm connection if the built-in audio is insufficient
If you are working alone, the lighter your kit, the better. Every extra cable, capture card, or extension cord is something you have to manage while also keeping an eye on the game clock. I have watched too many well-meaning parents spend the entire first quarter wrestling with OBS on a laptop while their kid sat on the bench waiting to check in. Simplicity is not laziness—it is the only way to sustain a full season of broadcasts.

Step 1: Position Your Camera for Full-Court Coverage
The most common mistake in basketball live stream production is placing the camera at one baseline and hoping the zoom will handle the rest. Digital zoom degradates quickly—unlike the crisp, uncompressed feed you get when using a professional capture card—and a low angle from the floor captures more backs of heads than actual plays.
The best single-camera position is mid-court on the sideline, elevated 8 to 12 feet. This gives you a centered view of both baskets, lets you follow transition offense without panning wildly, and keeps referees and benches out of the primary sightline.

If your gym allows it, mount the camera on a tripod behind the scorer's table or on the upper bleacher ledge. An 80-degree field of view will capture the full width of the court from roughly 15 to 20 feet away. If your camera has a narrower lens, you will need to move further back, which usually means higher bleachers and more crowd interference.
Elevation matters as much as horizontal position. From floor level, you lose sight of plays developing behind a screen or a post-up. From 10 feet up, you can see over defenders and read floor spacing the same way coaches do on film. If your tripod cannot reach that high safely, clamp a small ball head to the top bleacher rail or use a lightweight light stand with a sandbag for stability.
For advanced basketball streams, a three-camera setup delivers broadcast-level coverage:
| Camera | Position | Purpose |
|---|---|---|
| 1 | Mid-court sideline | Wide full-court master shot |
| 2 | Left baseline | Close-up of home basket action |
| 3 | Right baseline | Close-up of guest basket action |
Switching between these angles during timeouts or free throws makes the viewing experience far more engaging. Traditionally, this required three operators and a video switcher. Newer wireless systems let you control multiple cameras from a single phone app, which we will cover in Step 4.
Step 2: Optimize Frame Rate to Freeze Fast-Paced Action
Frame rate is the single most overlooked setting in youth sports streaming. Resolution determines how sharp a still frame looks, but frame rate determines how smooth motion appears. Basketball involves constant sprinting, passing, and shooting. At 24 fps or 30 fps, a crossover dribble becomes a blurry streak.

Best practice for basketball: Stream at 60 fps whenever possible. If your camera and platform both support it, 60 fps renders fast breaks and jump shots with crisp clarity. If you are limited to 30 fps, compensate with a wider shot so players occupy less of the frame as they move, which reduces the visible blur.
Shutter speed also matters. A good rule is to set your shutter at double your frame rate—1/120th of a second for 60 fps, or 1/60th for 30 fps. This preserves natural motion while preventing the overly staccato look that comes from an extremely fast shutter. In dim gyms, this can feel challenging because faster shutter speeds mean less light hitting the sensor. If your camera offers HDR or low-light boost, enable it, but keep the shutter discipline intact. Blurry motion is harder for viewers to forgive than a slightly grainy exposure.
Another tip: lock your exposure and white balance before the game. Auto-exposure in a gym will hunt constantly as players in white jerseys and black jerseys move across the floor. A locked exposure keeps the court floor consistent, and you can ride the gain slightly if your camera app allows manual ISO control.
Step 3: Set Up Audio That Actually Captures the Game
Poor audio ruins a sports stream faster than average video. Viewers forgive a slightly soft image, but they will exit quickly if they hear squeaking sneakers as a muddy rumble or the announcer as an unintelligible echo.
Start by scouting the gym during warm-ups. Listen for air conditioning vents, scoreboard buzzers, and crowd-facing walls that reflect noise. Position your camera or external microphone away from these sources.
If your sports recording camera has a built-in microphone array with AI noise cancellation, enable it in the app settings. The NearStream VM33, for example, carries eight MEMS microphones arranged in a 360-degree array with AI suppression. That configuration picks up coach calls, whistle blows, and on-court chatter from up to 25 feet while filtering out crowd roar and HVAC hum.
For even cleaner sound, run a 3.5mm cable from an external shotgun mic or a small digital recorder into the camera's audio input. Keep the mic pointed at the court, not the bleachers, and set levels so the loudest buzzer peaks at roughly -6 dB on your audio meter. Leaving too much headroom makes dialogue sound distant; pushing too close to 0 dB causes distortion when the crowd erupts after a three-pointer.
If your camera app supports audio mixing, you can blend the built-in array with an external source. That gives you the ambient court sound from the camera plus a tighter directional feed from a shotgun mic aimed at the coach or play-by-play announcer. It is the same technique professional broadcasters use, scaled down for a single-camera stream.

Step 4: Cut the Cords with a Wireless, All-in-One Setup
Here is where most streamers get overwhelmed. The traditional route involves a DSLR or camcorder, an HDMI capture card, a laptop running OBS, USB extension cables, and an Ethernet line for stable internet. That setup works, but it is heavy, fragile, and nearly impossible for one person to manage while also watching the game.
A simpler path is an all-in-one wireless streaming camera built specifically for live events. These devices encode the video internally, connect directly to Wi-Fi or mobile data, and stream to YouTube, Facebook, or a custom RTMP endpoint without a laptop in the chain.

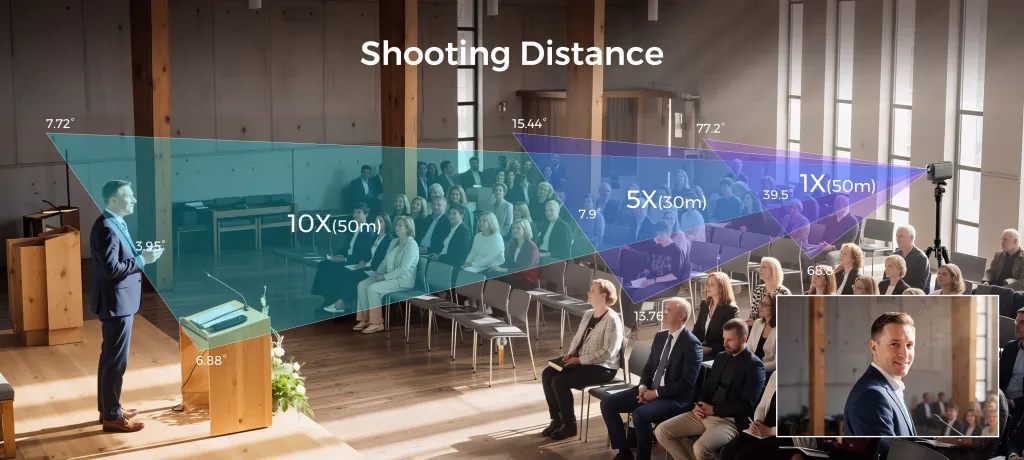
The NearStream VM33 is one of the best video cameras for sports in this category. It is not a generic webcam bolted onto a streaming box. It is a purpose-built 2K wireless camera with a 1/2.8-inch Sony CMOS sensor, a 10x optical zoom, and a built-in 6400mAh battery that delivers 6 to 8 hours of streaming—enough for a full tournament day.
Key specs that matter for basketball:
- 80-degree field of view at full wide, covering most of the court from the sideline
- 40x hybrid zoom (10x optical, 4x digital) to punch in on free throws or coach huddles without destroying image quality
- 2K recording to SD card while simultaneously streaming in 1080p, so you get an offline backup at higher resolution
- Multicam support for up to three VM33 units controlled from one iOS or Android app
- Wi-Fi, 4G/5G hotspot, or Ethernet connectivity, so you are not chained to the gym's router
- 8 MEMS microphones with AI noise cancellation, reducing the need for a separate audio rig
- Face-detection autofocus that tracks players as they move, rather than hunting back and forth

For parents who just want to stream their child's game to relatives, the single-camera workflow is simple: mount the VM33, connect it to the NearStream app, enter your YouTube or Facebook stream key, and press go. For coaches or semi-professional basketball streams, adding a second or third camera at each baseline lets you cut between wide action and tight basket coverage from an iPad on the scorer's table.
The app also supports overlays, picture-in-picture, and scoreboard graphics—features that make it the best camera for GameChanger app and sports clubs—so you can add a lower-third team name or a corner score bug without learning OBS layers.That polish separates amateur basketball live stream channels from the ones that attract consistent viewership.

You can learn more about the VM33 here: NearStream VM33 All-in-One Streaming Camera
Common Mistakes That Ruin Basketball Live Streams
Even with the right gear, these errors catch beginners off guard:
Relying on gym Wi-Fi without testing it. Many school networks throttle upload speeds or block RTMP ports. Arrive 45 minutes early and run a speed test from your exact camera position. If the network is unstable, use your phone's 4G or 5G hotspot instead.
Forgetting to charge or bring backup power. A camera dying at halftime is a stream killer. If your camera does not have a swappable battery, keep a USB-C power bank attached. The VM33's 6400mAh battery handles most game lengths, but all-day tournaments demand backup planning.
Using digital zoom as a crutch. Digital zoom crops the sensor and magnifies blur. Always prefer optical zoom or physical repositioning. The VM33's 10x optical zoom is the feature that sets it apart from entry-level streaming cameras that rely purely on digital crop.
Ignoring white balance. Gym lighting is notoriously mixed—sodium vapor, LED, and daylight through windows. Set a manual white balance before the game so the court does not shift from orange to blue every time the ball crosses the floor.
Missing the first quarter because setup took too long. A wireless, all-in-one sports recording camera eliminates most of this risk, but you should still rehearse your setup at home at least once before game day. Walk through the app menus, save your stream keys, and bookmark the RTMP server address.
Wired vs. Wireless: Which Setup Saves You Time?
If you are deciding between a traditional wired rig and a modern wireless all-in-one camera, here is a direct comparison:
| Feature | Traditional Wired Setup | NearStream VM33 Wireless |
|---|---|---|
| Core devices needed | Camera, capture card, laptop, cables | Camera + phone/tablet |
| Setup time | 25–40 minutes | 5–10 minutes |
| Operator count | Usually 2+ | 1 person |
| Zoom quality | Depends on lens; often digital only | 10x optical + 4x digital |
| Audio | External mic + mixer often required | 8 built-in MEMS mics + 3.5mm input |
| Battery life | Tied to wall outlets | 6–8 hours built-in |
| Multicam expansion | Extra switcher + operators | Up to 3 cameras, one app |
| Stream destinations | OBS → any RTMP | Direct to YouTube, Facebook, Twitch |
| Price (starting) | $800–$1,500+ | $359 |

For solo streamers and volunteer parents, the wireless path is not just simpler—it is often the only realistic way to produce consistent basketball live stream coverage without missing the game you came to watch.
FAQ
What frame rate is best for live streaming basketball without motion blur?
For basketball streams, 60 frames per second (fps) is ideal because it freezes fast breaks, dribbling, and jump shots with minimal motion blur. If your camera only supports 30 fps, position it at a wider angle and avoid digital zoom to keep action sharper.
Where should I place my camera to capture full-court basketball coverage?
Place your primary camera at mid-court on the sideline, elevated 8 to 12 feet, using a wide 80-degree field of view. For professional-style basketball live stream productions, add two baseline cameras and switch angles using a multicam app.
Can one camera really replace a full wired streaming setup for sports?
Yes. Modern all-in-one wireless streaming cameras like the NearStream VM33 combine a 2K sensor, 10x optical zoom, 8-mic array, and built-in battery into a single device that streams directly to YouTube or Facebook without capture cards, cables, or a dedicated laptop.
How do I get clear audio when streaming basketball games in a loud gym?
Use a sports recording camera with built-in MEMS microphone arrays and AI noise cancellation, or plug an external shotgun mic into the 3.5mm jack. Position the mic away from HVAC systems and crowd-facing walls for cleaner pickup of on-court sounds.
How long will a wireless streaming camera battery last during a tournament?
The NearStream VM33 delivers 6 to 8 hours of active streaming on its built-in 6400mAh battery, which covers most double-header days. For all-day tournaments, keep a USB-C power bank nearby or use the included AC adapter between games.
Conclusion
Streaming basketball does not require a broadcast truck or a film-school degree. It requires the right priorities: wide coverage so viewers see the whole play, sufficient frame rate so motion stays crisp, and a simple setup so you never miss the opening tip because you were still untangling HDMI cables.
Whether you are a parent sharing your child's season with grandparents, a coach reviewing game film, or a solo streamer building an audience, the best video camera for sports is the one that gets you live reliably. An all-in-one wireless sports recording camera like the NearStream VM33 removes the complexity that stops most people from streaming consistently. Mount it, connect it, and stream the game—no laptop required.
If you are ready to upgrade your next basketball live stream, start by testing your gym's upload speed, scouting your camera position at the next game, and comparing a wireless workflow against whatever gear you are using now. The difference in setup time and stream quality will be obvious before the first whistle.


