


Vlogging is, at its heart, about sharing your story and your passion. For creators in the craft and cooking space, this presents a unique challenge. Your passion involves your hands. You're kneading dough, soldering a circuit board, or painting a miniature. But your story also involves your face, your personality, and your direct connection with your audience.
So how do you film both?
If you're a solo creator, you know the pain. You either film your face or your hands, resulting in a static, one-dimensional video. Or, you film in segments, constantly stopping to wipe flour off your hands, move the tripod, re-frame the shot, and hit record again. This is frustrating, inefficient, and kills your creative flow.
You've probably looked for a best vlogging camera, but the solution isn't just a better camera; it's a smarter setup.
This tutorial is your step-by-step guide to building a professional, fixed-camera studio that lets you, a solo creator, film dynamic, multi-angle vlogs without ever leaving your craft table or kitchen counter. We'll build this entire vlog camera setup around a powerful and affordable 4K vlogging camera ecosystem: the NearStream VM20.
Why a "Fixed-Camera" Vlog Camera Setup Wins for Stationary Creators
First, let's define our terms. This is not a "run-and-gun" setup for travel vlogging. This is a "studio" setup for creators who work from a fixed location (a desk, workbench, or kitchen counter). For this niche, a fixed setup is superior in every way.
- It's Dynamic: A multi-camera setup, which is what we're building, allows you to switch between different angles (your face, your hands) in real-time. This keeps your audience engaged far more than a single, static shot. 1
- It's Efficient: You set it up once. When inspiration strikes, you don't spend 30 minutes framing shots. You walk up, turn on your lights, and hit record. Your flow is never interrupted.
- It's Professional: Consistency is key. Your angles are locked. Your lighting is consistent. Your audio is clear. This reliability is what separates amateur content from a professional-grade channel.
The Core Gear: Your Solo 4K Vlogging Studio
This entire tutorial is built on a specific ecosystem of gear designed to work together. This camera setup solves the three biggest problems for solo creators: video, audio, and mounting.
1. The Brain: NearStream VM20 4K Video Vlog Camera
The heart of our system is the NearStream VM20. This isn't a typical DSLR. It's a 4K "studio" camera that connects to your computer via a single USB-C cable. 2 It is a UVC (USB Video Class) device, which is a technical way of saying it's 100% plug-and-play. Your computer and software (like OBS, Zoom, or Teams) will instantly see it as a high-end webcam, with no drivers needed. 4
Its killer features for vloggers are:
- 4K Resolution: Delivers a crystal-clear 4K image at 30fps. 2 This gives you incredible detail for your crafts and, as we'll see, massive flexibility in editing.
- 10x Optical Zoom: This is its secret weapon. Most webcams have "digital zoom," which just crops and ruins the image. The VM20 has a true optical lens that can zoom in 10x without losing a single pixel of quality. 2
- 360° RF Remote: This is your "production assistant." It controls the zoom, focus, image settings, and presets from anywhere in the room. 10
- 3.5mm Mic Input: As we'll see, this is the most critical feature for pro-level vlogging. 2

2. The Voice: NearStream AWM20T Wireless Microphone
Vlogging Rule #1: Audio is more important than video. Your audience will forgive a slightly soft image, but they will click away instantly if your audio is echoing, muffled, or full of background noise.
A camera's built-in microphone, even the VM20's advanced 8-mic array, is a "room" mic. 11 It's designed to pick up everything, including the hum of your fridge, the echo of the kitchen, and the clang of a pot. 12
The solution is a wireless lavalier mic like the NearStream AWM20T. 13 This clips to your shirt, capturing only your voice with clarity. 14 You are free to move around your kitchen or workshop, and your audio level will remain perfectly consistent and clear. 15

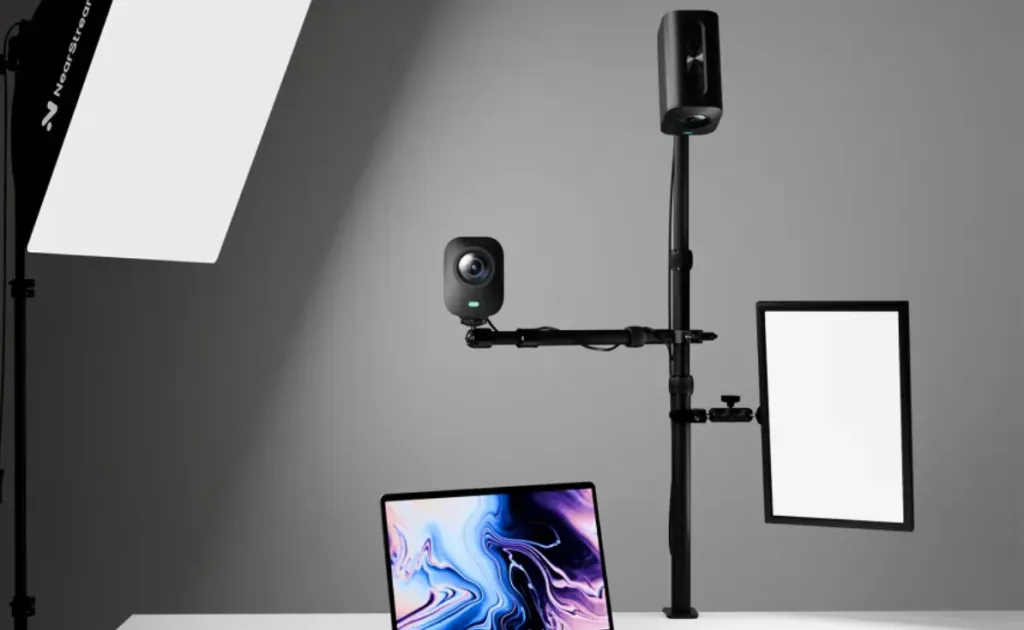
3. The Foundation: ST40 Dual-Arm Mount
You can't get professional multi-angle shots with wobbly tripods taking up all your counter space. The ST40 is a heavy-duty, dual-arm desktop mount. 16 It uses a strong C-clamp to attach to the back of your table, freeing up your entire workspace.
- Arm 1 (Portrait): You'll use this arm to mount your first camera, pointing at your face.
- Arm 2 (Overhead): This is a boom arm, which you will extend out over your workspace to get that classic, top-down "Tasty-style" shot of your hands.

Step-by-Step Tutorial: Building Your VM20 Multi-Camera Setup
This tutorial assumes you have two VM20 cameras to create the ultimate solo-production setup. This allows you to capture your "portrait" and "desktop" perspectives simultaneously.
Step 1: Physical Setup – Mounting Your Two Cameras
- Secure the Base: Attach the ST40 Dual-Arm Mount to the back edge of your craft table or kitchen counter. Ensure it's clamped tightly and is stable. 16
- Mount Camera A (Portrait): Attach your first VM20 to one of the ST40's arms. Position this camera at eye level, capturing your main "talking head" shot. 16
- Mount Camera B (Overhead): Attach your second VM20 to the ST40's second arm. Extend this arm out over your workspace (your cutting board, mixing bowl, or craft mat) and point it straight down.
- Connect to Computer: Connect both cameras to your computer's USB ports. Your computer will now see two new 4K webcams. 2
Step 2: The Audio Workflow – Getting Perfect Sound
This step is critical and will set you apart from 90% of vloggers.
- Clip the Mic: Clip the AWM20T transmitter (the microphone) to your shirt.
- Connect the Receiver: Take the AWM20T's receiver and plug it into the 3.5mm "AUX Port" on the back of Camera A (Your Portrait Camera). 17 Use the included 3.5mm TRS-to-TRS cable (the one with identical plugs on both ends). 19
- Power On: Turn on the AWM20T transmitter and receiver. They will pair automatically.
Why this is the pro method: The high-quality audio from your wireless mic is now embedded directly into the 4K video feed of your "Portrait" camera. When you bring your cameras into your software, your primary "face" camera will have your audio perfectly synced and ready to go. No audio interfaces, no complex routing. 18

Step 3: The Software Setup – Using OBS Studio
The easiest way to record and switch between your two cameras is with free software like OBS Studio. 22
- Download OBS Studio: It's free for Mac, Windows, and Linux. 23
- Add Your Cameras:
- In the "Sources" panel in OBS, click the "+" button and select "Video Capture Device."
- Name it "VM20 - Portrait." In the device list, select your first VM20. Set the Resolution to 3840x2160 and Frame Rate to 30fps. 2
- Click "+" again and add another "Video Capture Device."
- Name it "VM20 - Overhead." Select your second VM20 camera and set its resolution to 4K.Add Your Audio:
- Click "+" in the "Sources" panel and select "Audio Input Capture."
- Name it "AWM20T Mic" and select "Microphone (NearStream USB VM20)" from the device list. (Remember, your mic is plugged into your camera, so the camera is the audio source). 17
- You should now see the audio meter for "AWM20T Mic" moving in the "Audio Mixer" panel.
- Create Your "Scenes":
- In the "Scenes" panel, rename the default scene to "1 - Portrait Cam." In this scene, make the "VM20 - Portrait" source full-screen.
- Create a new scene by clicking the "+." Name it "2 - Overhead Cam." In this scene, make the "VM20 - Overhead" source full-screen.
- Now, when you click between these two scenes, you are "switching" your vlog, just like a live TV show. 23

Step 4: The "Magic" – Using Your Remote as a Solo Director
This is where your vlog camera setup becomes a true solo studio. You're at your counter, covered in flour, and you need a close-up. You don't have to stop.
The VM20's 360° RF remote is your secret weapon. 10
- Pair Your Remote: You can pair your remote to control both cameras. Use the NearSync software to manage your devices. 17
- Program Your Presets: The remote has three preset buttons. 29
- Preset 1 (Host Shot): Select your "1 - Portrait Cam" scene in OBS. Use the remote to aim, zoom, and focus on your face perfectly. Long-press the 'Set 1' button until the camera saves the position. 29
- Preset 2 (Overhead Wide): Select your "2 - Overhead Cam" scene in OBS. Use the remote (now controlling Camera B) to frame your entire workspace. Long-press the 'Set 2' button. 29
- Preset 3 (Overhead Detail): While still on your "Overhead Cam" scene, use the remote's 10x optical zoom to push in for an extreme close-up of your cutting board or craft. 2 Long-press the 'Set 3' button. 29
Your New Workflow:
You're now filming. You start by talking to the camera (Scene 1). You then tell OBS to switch to Scene 2 (e.g., using a hotkey). Your audience sees your hands (Preset 2). You say, "Now look closely at this technique," and from your counter, you simply press "3" on your remote. Your overhead camera instantly and silently zooms into the perfect 10x close-up. Press "2" and it zooms back out. All without a single cut.
Pro-Tip: Lock Your Focus!
Autofocus will "hunt" (blur in and out) on an overhead shot every time your hands move. Use the remote to get a sharp focus on your work surface and then press the manual focus lock button. 29 Your shot will stay sharp and professional forever.
The Final Polish: How to Light Your Indoor Vlog
Your camera setup is complete, but there's one last step: lighting. Bad lighting will make even a 4K camera look grainy and amateurish. For indoor vlogs, you must control the light.
- For Your Face (Camera A): Use a Ring Light. A ring light is perfect for a "talking head" shot. Place it directly in front of you, with your portrait camera (VM20) in the center. 30 It creates a flattering, shadowless light and that signature "catchlight" in your eyes that connects with your audience.
- For Your Workspace (Camera B): Use a Softbox. Do NOT use a ring light for your overhead shot. It will create a harsh, circular reflection on your cutting board, knives, or any glossy craft item. A softbox is the pro choice. It creates a large, soft, diffused light (like a window) that beautifully illuminates the texture of your food or craft without harsh glare.
Conclusion: Your Story, Your Studio
Vlogging as a solo creator is about sharing your authentic passion. Your gear shouldn't get in the way of that; it should make it easier. By moving to a fixed-camera studio, you solve your biggest workflow frustrations.
This vlog camera setup—built around the VM20's 4K optical zoom and remote-control presets 2, the AWM20T's crystal-clear wireless audio 13, and the ST40's stable multi-angle mounting 16—is the ultimate solution for any creator who works with their hands. You can now focus on your craft, not your camera.
Ready to build your pro-level home studio? Explore the NearStream VM20 4K Camera, AWM20T Wireless Microphone, and ST40 Dual-Arm Mount to get started.
Frequently Asked Questions (FAQ)
1. What is the single most important part of my vlog camera setup?
Audio. Hands down. Bad audio is the #1 reason viewers abandon a video. A $50 external microphone will make your vlog sound more professional than a $3,000 vlogging camera using its built-in mic.
2. Do I really need 4K for a vlog?
Yes. In 2025, 4K is the standard. Its biggest benefit isn't just clarity; it's the ability to crop or "punch in" on your footage during editing to create a close-up shot from a wide shot, all while maintaining 1080p HD quality.
3. What is a UVC video vlog camera?
UVC stands for "USB Video Class." 4 It's a universal standard that allows a camera (like the VM20) to plug directly into any computer (Windows, Mac, Linux) and work instantly, just like a webcam, with no special drivers or capture cards needed. 7
4. What's the best vlogging camera for a beginner?
The best vlogging camera for a true beginner is the smartphone you already own. Once you get frustrated by its limitations (bad audio, low storage, poor zoom), you'll be ready to upgrade. For a stationary vlogger, the best vlogging camera to upgrade to is a UVC-based studio camera like the VM20.
5. What is the best vlogging camera for cooking and craft vlogs: a ring light or a softbox?
You need both. Use a ring light for your "talking head" (portrait) shot. 31 Use a softbox for your "overhead" (desktop) shot. A ring light will create terrible reflections on shiny knives, mixing bowls, or glossy paint; a softbox creates a soft, natural, reflection-free light that is perfect for food and crafts.
Cited works
- Everything You Need to Know About Multi-Camera Live Streaming - Switcher Studio, accessed November 6, 2025.https://www.switcherstudio.com/blog/multi-camera-live-streaming
- VM20.pdf
- Remote Teaching Setup Options - Teach Anywhere - Stanford University, accessed November 6, 2025.https://teachanywhere.stanford.edu/remote-teaching-setup-options
- USB video device class - Wikipedia, accessed November 6, 2025.https://en.wikipedia.org/wiki/USB_video_device_class
- What is a UVC camera? [Answered] - Reolink, accessed November 6, 2025.https://reolink.com/blog/uvc-camera/
- USB Video Class (UVC) Explained: Revolutionizing Video Transfer | Synopsys Blog, accessed November 6, 2025.https://www.synopsys.com/blogs/chip-design/uvc-device-video-streaming.html
- USB Video Class (UVC) Camera Implementation Guide - Windows drivers | Microsoft Learn, accessed November 6, 2025.https://learn.microsoft.com/en-us/windows-hardware/drivers/stream/uvc-camera-implementation-guide
- USB Video Class (UVC) Explained: Making Your Camera Truly Plug-and-Play, accessed November 6, 2025.https://www.aiusbcam.com/news/746732000722100288.html
- What is a UVC camera? A Beginner guide - Sinoseen, accessed November 6, 2025.https://www.sinoseen.com/what-is-a-uvc-camera-a-beginner-guide
- How to Use Remote Control of NearStream VM20? - YouTube, accessed November 6, 2025.https://www.youtube.com/watch?v=qu4HfZayrv0
- DSLR Quality Streaming Camera for Webcam Use - NearStream VM20, accessed November 6, 2025.https://www.nearstream.us/4k-wired-streaming-camera-vm20
- NearStream VM20 Review: A Value Live Streaming Camera for Video in 2025, accessed November 6, 2025.https://www.nearstream.us/blog/live-stream-camera-nearstream-vm20-review
- Sony and DJI mic 3 VS NearStream. Can a budget system compete? - YouTube, accessed November 6, 2025.https://www.youtube.com/watch?v=tbmwDRY2uco
- A Beginner's Guide - Microphone for Live Streaming - NearStream, accessed November 6, 2025.https://www.nearstream.us/blog/external-microphone-for-live-streaming
- A Beginner's Guide to Wireless Microphones for Content Creations - NearStream, accessed November 6, 2025.https://www.nearstream.us/blog/beginner-guide-to-wireless-mic
- Your Complete Podcasting Solution in One Place! - NearStream, accessed November 6, 2025.https://www.nearstream.us/solutions/home-studio-solutions
- NearStream VM20 4K Webcam with 10X Optical Zoom Tutorial & Review - YouTube, accessed November 6, 2025.https://www.youtube.com/watch?v=qzP9ai7_2CA
- Add your microphone directly to This 4K Webcam – NearStream VM20 Review! - YouTube, accessed November 6, 2025.https://www.youtube.com/watch?v=EPbyfXdSmf4
- NearStream AWM20T | Dual Wireless Lavalier Microphone, accessed November 6, 2025.https://www.nearstream.us/wireless-microphone-awm20t
- The NearStream Wireless Lavalier Microphone System AWM20T User Manual was accessed on November 6, 2025.https://manuals.plus/asin/B0CQXHTKLR
- The NearStream AW-AWM20T wireless microphone. Easy to handle! - YouTube, accessed November 6, 2025.https://www.youtube.com/watch?v=DibDQ4h-00g
- How to set up multiple camers for an online podcast: r/obs - Reddit, accessed November 6, 2025.https://www.reddit.com/r/obs/comments/1izt27t/how_to_set_up_multiple_camers_for_a_online/
- How to Teach Online Using OBS for Zoom and Other Virtual Meetings. Share Multiple Cameras - YouTube, accessed November 6, 2025.https://www.youtube.com/watch?v=-JcGy5fCE1w
- Complete OBS Tutorial for Teachers, Trainers, and Video-makers - YouTube, available November 6, 2025.https://www.youtube.com/watch?v=wO2gswOEVAQ
- OBS Multi-Camera Setup (Multiple Video Sources and Scenes in OBS) | OBS Tutorial, accessed November 6, 2025.https://www.youtube.com/watch?v=lnxWXuwtkRM
- How to Use the VM20 Streaming Camera: A complete user manual - NearStream, accessed November 6, 2025.https://www.nearstream.us/help-center/vm20-streaming-camera-user-guide-manual
- Step by Stey Guide: How to Download & Set up NearSync? - YouTube, accessed November 6, 2025.https://www.youtube.com/watch?v=mn1cp2ZMKqg
- NearStream VM20 4K CAMERA: Live Streaming Made Easy - YouTube, accessed November 6, 2025.https://www.youtube.com/watch?v=oHmo-Bg20FQ
- Tested: How to Control Effortlessly Multi-Cam Stream with NearStream VM20, accessed November 6, 2025.https://www.nearstream.us/blog/control-multi-camera-livestream-alone-nearstream-vm20
- The Ultimate Guide to Video Switchers: Enhance Your Live Streaming Setup, available November 6, 2025.https://www.nearstream.us/blog/ultimate-guide-to-video-switchers
- How to Use a Ring Light for Video - Lume Cube, accessed November 6, 2025.https://lumecube.com/blogs/news/how-to-use-a-ring-light-for-video
- Where to Put Ring Light For Stream? - K\&F Concept, accessed November 6, 2025.https://www.kentfaith.com/blog/article_where-to-put-ring-light-for-stream_25321
- How to set up and use a ring light - YouTube, accessed November 6, 2025.https://www.youtube.com/watch?v=JpIlPnoPPgM


