


According to Business Insider, GameChanger attracted over 5 million users in 2024, with each user spending an average of 30 minutes daily. The platform supports more than 1 million teams and over 7 million games annually (source).
However, over 60% of schools and amateur broadcasters report challenges such as complex equipment and difficult operation due to lack of professional technical support.
This article will guide you through simple equipment choices and easy step-by-step workflows to achieve high-quality sports live streams without a dedicated tech team. Keep reading to master stress-free streaming and never miss a game’s key moments!
Why Livestream School Sports on GameChanger?
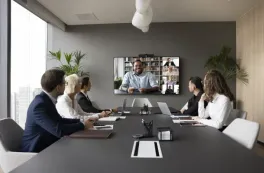
GameChanger is a live streaming platform specifically designed for school sports. It streamlines the broadcasting process—no tech team or complicated gear required. All you need to do is connect your video device to GameChanger, and you’re ready to stream. The platform supports real-time score updates, player stats, and even auto-saves each game for easy playback and sharing.
Live streaming not only enhances family engagement but also gives students a more meaningful stage to showcase their skills. For schools, this technology boosts interaction and visibility, helping school sports take a major step toward greater professionalism.

Understanding GameChanger’s Streaming Requirements and Compatible Cameras
RTMP: What You Need to Know
GameChanger uses RTMP protocol for streaming. All you need is:
- A camera or app that supports RTMP
- GameChanger’s stream key and URL
Many modern streaming cameras already support this — no extra computer or software needed.
Video & Audio: The Essentials
Recommended video settings:
- Resolution: 1080p
- Frame rate: 30–60fps
- Bitrate: 3000–6000 kbps
Audio matters too. Built-in mics are often noisy or distant. Use a wireless or condenser mic to get clear sound, especially in outdoor games.
Camera Features to Look For
A good GameChanger camera should have:
- RTMP streaming
- Zoom (20X or more is great)
- Auto-focus, image stabilization
- Wi-Fi or Ethernet
- Mic input
Best Camera Options
| Camera Type | Notes |
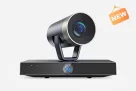
| NearStream VM46 | Built-in RTMP, wireless, zoom-ready |
| DSLR + Capture Card | High quality, more setup needed |
| Webcam | Simple, limited features |
Step-by-Step Setup Guide for GameChanger Live Streaming
1️⃣ Equipment Checklist
Before you go live, make sure you have:
- A camera that supports RTMP
- A microphone (wireless or condenser mic recommended)
- A tripod or camera stand
- Stable internet connection (Wi-Fi or Ethernet)
Optional but helpful:
- An audio mixer (for better control)
- Extra batteries or power bank
2️⃣ Set Up Your Camera and Audio Gear
- Mount the camera securely using a tripod or stand.
- Connect your mic to the camera or use a wireless mic directly.
- Do a quick sound check: test levels and clarity.
- If using a mixer, adjust gain and monitor live input.
3️⃣ Connect to GameChanger
- Log into your GameChanger Team Manager app.
- Go to the team → “Schedule” → choose the game → tap “Stream”.
- GameChanger will generate a stream URL and stream key.
- Copy them — you’ll need these to set up your camera or streaming app.
4️⃣ Configure Your Stream Settings
If using a streaming camera or app (like OBS or Larix):
- Input the stream URL and key into the RTMP settings.
- Set:
- Resolution: 1920x1080 (1080p)
- Frame Rate: 30 or 60 fps
- Bitrate: 3000–6000 kbps
These settings help keep the stream smooth and clear.
5️⃣ Test Before You Go Live
- Start a private stream to check video and audio quality.
- Walk around with the mic to ensure stable sound.
- Confirm there are no lags or signal drops.
- Monitor the feed using a second device or assistant

How to Manage Your Live Stream Without a Tech Team
- Flowchart: Easy Live Streaming Without a Tech Team
Goal: Emphasize “Simple & Stress-Free” at every step.
- Device Setup (Icon: Plug & play symbol) Connect your camera, microphone, and power on all devices. Simple connection, no hassle.
- Start Streaming (Icon: Play button) Open your streaming software/app and click “Go Live.” One-click start.
- Monitor Video & Audio (Icon: Eye + sound waves) Keep an eye on your video preview and audio levels. Make sure everything looks and sounds good.
- Multi-Platform Streaming (Icon: Multiple screens or platforms logo) Stream simultaneously on Twitch, YouTube, TikTok, etc. Reach your audience everywhere.
- End Live Stream (Icon: Stop button) Click “End Stream” when done. Wrap up smoothly.
- Save Recording (Icon: Save or download symbol) Automatically save your live session for later editing or sharing. Never lose your content.
- Multi-Platform Live Streaming Layouts
Goal: Show recommended screen layouts for different platforms.
- Horizontal Layout (Landscape) (Icon: Wide monitor or smartphone in landscape) Best for Twitch and YouTube live streams. Wider view fits these platforms’ player sizes.
- Vertical Layout (Portrait) (Icon: Smartphone in portrait) Best for TikTok and other mobile-first platforms. Optimized for mobile viewers.
Quick Switch & Settings Tips:
- Use your streaming software’s layout presets to switch orientation.
- Adjust resolution: 1920x1080 for horizontal, 1080x1920 for vertical.
- Preview layout before going live.
- Quick Troubleshooting Table
td {white-space:nowrap;border:0.5pt solid #dee0e3;font-size:10pt;font-style:normal;font-weight:normal;vertical-align:middle;word-break:normal;word-wrap:normal;}
| Common Issue | Possible Cause | Easy Fix |
| No Video Signal | Camera not powered on | Check power, restart device |
| No Audio | Mic not connected | Plug in mic, ensure mute is off |
| Can't Start Streaming | Wrong stream key | Verify and re-enter stream key |
| Stream Disconnects | Unstable internet | Switch to mobile hotspot, lower bitrate |
- Emergency Plan Mind Map: "Streaming with Network Fluctuations"
Center: Network Issues During Live Stream (Icon: Wi-Fi signal with warning)
Branches:
- Switch Hotspot (Icon: Mobile signal) Quickly change to a mobile hotspot or backup network.
- Lower Bitrate (Icon: Down arrow with data) Reduce stream quality to maintain stability.
- Reconnect Stream (Icon: Refresh or reconnect arrows) Stop and restart the stream if disconnected.
Tip Box: Prepare backup plans in advance to minimize downtime and keep your audience engaged.
Recommended Equipment for GameChanger Streaming
Choosing Your Equipment: Tips and Budget Guidelines
When selecting streaming gear, consider your current needs and budget:
- Entry Level ($100–$300): Basic webcam or smartphone with a ring light and USB mic. Good for beginners testing the waters.
- Mid Range ($300–$800): Cameras like the NearStream VM33, combined with quality microphones (e.g., AM10X) and simple tripods or mounts. Ideal for serious streamers wanting improved quality and reliability.
- Advanced ($800+): Multi-camera setups using NearStream VM46, professional audio mixers, lighting kits, and capture cards for full control and high production value.

Focus on devices that offer simple setup and compatibility with your streaming platform, minimizing technical headaches.
FAQ
Q1: What microphone should I use for clear outdoor audio? A: Wireless or condenser microphones with noise reduction and wind protection work best. Avoid built-in camera mics for clearer sound.
Q2: How do I switch between horizontal and vertical streaming layouts? A: Adjust your streaming software or camera settings to landscape for Twitch/YouTube and portrait for TikTok. Always preview before streaming.
Q3: What to do if my livestream disconnects due to poor internet? A: Switch quickly to a mobile hotspot, lower your bitrate, or restart the stream. Preparing backup plans reduces downtime.