


Want to stream your favourite game or host a watch party with friends online? Discord makes it easy and interactive. Launched in 2015, Discord is a free platform for voice, video and text communication used by over 259.2 million people each month. Originally a hub for gamers, it’s now a go to app for communities, study groups and even remote work teams. One of its most powerful features is screen sharing, which allows users to stream games, movies, or apps in real-time.
Whether you want to show off your skills or collaborate with your team, Discord’s streaming feature delivers smooth performance with low latency. This article will cover everything from setting up your stream to optimising your audio and video settings so you can start broadcasting in no time. Let’s get started and stream like a pro!
Why Stream on Discord?
Discord has evolved far beyond its origins as a simple chat app for gamers. Today, it’s a powerful platform for real-time communication, community building, and, most notably, streaming. Whether you’re a gamer sharing your playthrough, a teacher conducting a lesson, or just hanging out with friends, Discord offers a smooth, interactive, and customizable streaming experience.
Streaming vs Traditional Calls: Why Go Live
While traditional video calls like those on Zoom or Google Meet are great for face-to-face interactions, Discord streaming is a one-to-many broadcast style that sets it apart. Instead of featuring every participant on screen, Discord lets the streamer control what viewers see – be it a game, an app window, or a browser tab.
This curated experience minimises chaos and maximises engagement. Instead of a crowded gallery view, viewers focus on a single screen while still participating via voice or text chat. It’s a streamlined experience designed for clarity and interaction, not just presence.
Technically, Discord’s infrastructure is different, too. Where traditional platforms adjust bandwidth based on participants, Discord uses a multi-process pipeline optimised for high-resolution images and high frame rates. This makes it perfect for smooth visuals which are essential for fast-paced games, detailed tutorials, or creative showcases.
Perfect for Gaming, Tutorials, Hangouts, and More
Discord’s “Go Live” feature is like showing a screen to a friend sitting beside you. It’s intuitive and immediate – click a button and you’re live. This makes it perfect for:
Gaming Sessions: Discord auto-detects most games so that you can stream without any setup hassle.
Educational Tutorials: Share an app or browser window and walk others through step by step.
Creative Collaborations: Collaborate in real-time with screen share and voice – perfect for designers, writers, and coders.
Virtual Hangouts: Host movie nights, play online games together, or just chill and chat.
From virtual classrooms and professional webinars to weekend watch parties, Discord adapts to almost any context, offering both utility and fun.
Private, Interactive, and Low-Lag Streaming on Discord
Streaming on Discord is both private and performant. Streams are shared only with members of your voice channel, offering a level of control and privacy that public platforms can’t match. This makes Discord perfect for team meetings, private coaching, or low-key community streams.
In terms of quality, Discord provides everyone with 720p at 30fps by default. For higher performance:
Nitro Classic subscribers unlock 1080p at 60fps.
Nitro subscribers can stream in stunning 4K at 60fps.
The platform uses WebRTC-based bandwidth estimators to tailor the stream quality to each viewer's connection. It minimizes lag and buffering through smart optimizations, ensuring a seamless experience. Real-time voice chat integrated with the stream encourages participation and collaboration, rather than passive watching.
And if any issues arise – such as lag or choppy visuals – users can fine tune their setup by adjusting stream quality, disabling hardware acceleration or optimising system resources.
How to Stream on Discord (Step by Step)
Discord makes it easy to stream your games, apps, or entire screen to friends or communities. Whether you’re in a private server or a large group, the Discord Go Live feature lets you share content with just a few clicks. Here’s how to get started.
Setting up your Server and Voice Channel
Before you can start streaming, you need to be on a server with a voice channel.
If you already have a server, just join any voice channel where you want to stream.
If you’re a server admin, make sure the “Video” permission is enabled under the channel’s settings. This permission is usually turned on by default, but can be customized for each role or channel.
Once you’re in the voice channel and have permission, you’re ready to stream.
How to Go Live on Discord
After connecting to a voice channel, here’s what you need to do:
Follow these steps to set up your own server in just minutes:
- Open the Discord app.
Click the ➕ (plus) icon on the left-hand menu.

In the pop-up window, select “Create My Own.”

Give your server a name and upload a custom image (optional).

- Click “Create” to finish setting up your server.
Your viewers will see your stream in a small pop-up window, and the stream will auto-pause if you switch out of your game. To stop streaming, click the Screen icon again or just leave the voice channel.
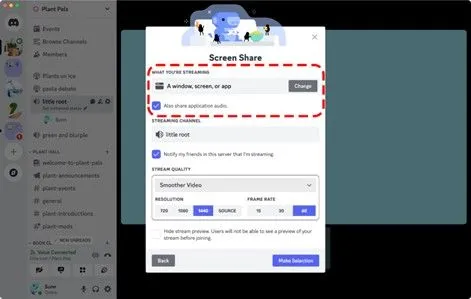
Sharing Your Screen vs. Streaming a Specific App
Discord gives you two main streaming choices:
Screen sharing: Shows everything on your selected monitor, which works great for presentations or tutorials that need multiple applications
Application sharing: Shows just the selected app window, even when minimized—perfect for gaming while keeping an eye on chat.
Discord detects running software automatically for application sharing. This option helps protect your privacy, as viewers only see the specific application instead of your entire desktop.
How to Stream Games on Discord Automatically
Discord makes game streaming simple with built-in detection:
Start your game before or after joining a voice channel
Discord detects the game and shows its name below your server's channel list
Click the monitor icon with an arrow located next to the game's name.
Pick your quality settings and click Go Live.
If your game doesn't show up:
Go to User Settings > Activity Status.
Click “Add it!”, then select your game from the list.
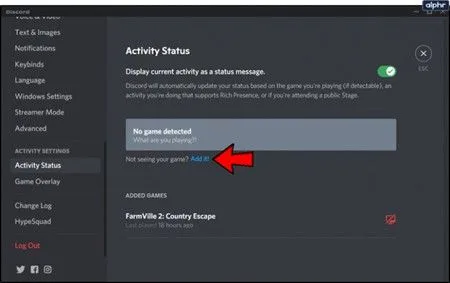
After adding it, your game will automatically show up in your streaming options whenever you launch it.
Final Tip: Whether you're showing off gameplay, hosting a study session, or sharing your screen for a quick walkthrough, Discord makes streaming smooth and fast. Just follow these steps, and you'll be up and streaming in no time!
Discord Stream Settings You Should Know
The quality of your Discord broadcasts really depends on your stream settings. Getting these settings right will help you create a smooth streaming experience for everyone involved.
Choosing the Right Stream Quality (Resolution, FPS)
Your stream’s visual quality heavily depends on your resolution and frames per second (FPS) settings. Discord’s default streaming quality is set to 720p resolution at 30 frames per second (FPS). This setting works well for casual screen sharing and basic gameplay.
However, if you’re a Nitro Classic subscriber, you can boost this to 1080p at 60 FPS. For Nitro users, Discord supports up to 4K at 60 frames per second (FPS), ideal for sharing high-end content and professional visuals.
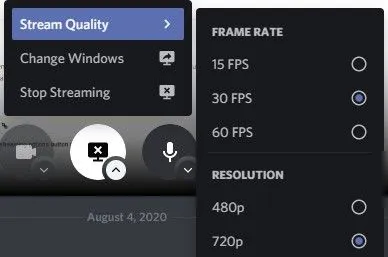
To adjust these settings mid-stream:
Hover over your Picture-in-Picture stream window.
Click the gear icon (Settings).
Click on “Stream Quality” and pick your preferred resolution and frame rate.
Note: Higher resolutions require more internet bandwidth and CPU power. If you experience lag or stuttering, lower the quality to maintain smooth performance and a better viewing experience.
Audio Settings for Clear Voice and Game Sound
Crystal-clear audio is just as crucial as sharp video quality. Whether you're narrating gameplay or chatting with friends, you want both voice and system sound to be heard clearly.
To configure:
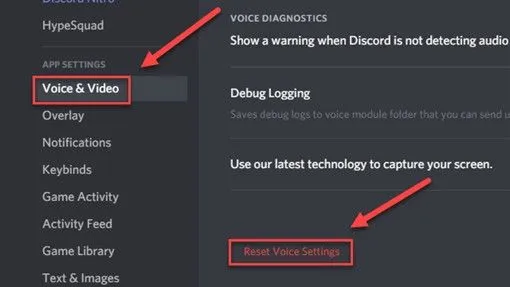
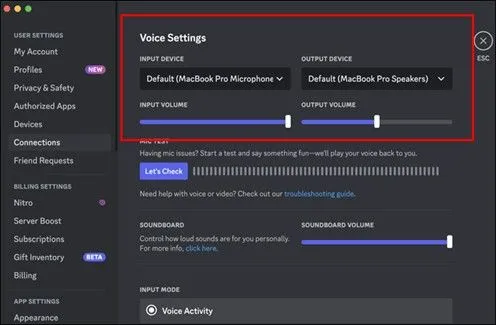
Open “User Settings”, then select “Voice & Video.”
Set your input (mic) and output (speakers/headphones) devices.
Always enable “include audio” when starting a stream to ensure game sound is shared.
If your viewers can’t hear your game audio or microphone, try these quick fixes:
Scroll down to the bottom of the Voice settings menu and select “Reset Voice Settings.”
Temporarily disable echo cancellation, noise suppression, or other advanced features.
Mac users should ensure Discord has permissions for the microphone and screen recording under System Preferences.
Permissions: Who Can Watch Your Stream?
Controlling who can view or broadcast in your Discord server is important, especially for private or structured events.
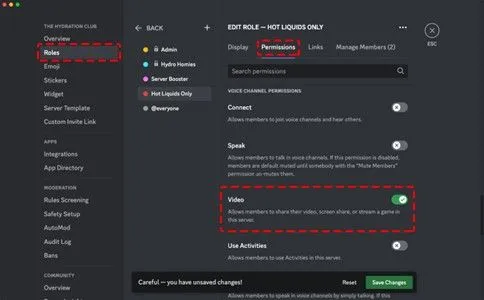
Streaming works in Voice Channels using the “Video” permission.
To adjust these:
Open “Server Settings” and select “Roles”
Select a role and scroll to Voice Channel Permissions
Enable/disable the Video permission accordingly
You can also manage permissions on a channel-by-channel basis, giving you granular control over who can stream and who can’t. This is ideal for managing large servers or hosting events like community game nights or movie streams.
Stream Optimization Tips for Low-End PCs
Discord streaming can be heavy on your system resources. Here's what you can do to optimize:
Disable Hardware Acceleration in Discord’s Appearance settings if you notice graphical lag.
Close unnecessary background apps to free up RAM and CPU usage.
Advanced users can delete unnecessary Discord modules or use tools like Process Lasso to restrict Discord’s resource consumption.
Stream games in Windowed mode instead of Fullscreen—it’s easier on your system and helps Discord capture the stream more efficiently.
Balancing visual quality with performance is key. If you're using a budget setup, start with lower settings and gradually increase quality as your system allows.
How to Go Live on Discord (Mobile and Desktop)
Discord lets you stream from both mobile devices and computers. The platform allows users to stream from any device, whether they're on desktop or mobile.
How to Start a Discord Live Stream on Mobile
Going live from your phone is quick and easy:
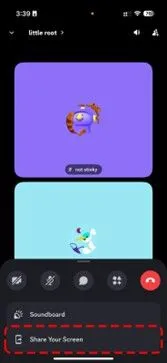
Open the Discord app on your mobile device.
Join a voice channel on any server where you have the necessary permissions.
Swipe up on the bottom toolbar once you're in the voice channel.
Tap "Share Your Screen."
Confirm screen sharing when your device asks for permission.
💡 Tip: When you stream on mobile, everything on your screen is visible, including messages and notifications. To keep things private, turn off or mute notifications before you start streaming.
How to Stream from Desktop or Browser
Streaming on a computer offers more control and better quality. Here's how to do it:
Open “Discord” on your desktop app or browser.
Join a voice channel on your server.
Look at the voice status panel and click the “screen icon” (a monitor with an arrow).
Choose how you want to stream:
Application: Share just one program (like a game or browser tab).
Screen: Show everything on your monitor.
Capture Device: Use a webcam or external device.
✅ Audio Tip: If you're using Chrome, you can stream with sound, but this doesn't work on Linux or some other browsers.
Troubleshooting Common Discord "Go Live" Issues
Users sometimes run into streaming problems. When Discord captures the wrong screen, restart both Discord and the app you want to stream. Audio issues often arise from incorrect input or output settings.
These steps can fix common audio problems:
Check if the "also share application audio" box is selected
Look at Discord's audio settings under "Voice & Video."
Make sure your output devices have the correct volume levels
Problems that persist may need a reset of Discord audio settings or a check of Windows sound settings. Mac users should verify Discord has the right microphone and screen recording permissions in system settings.
Pro Tips for a Smoother Discord Streaming Experience
You need more than basic settings to level up your Discord streaming. Pro streamers focus on both technical setup and audience engagement. These expert strategies will help you stream more smoothly and look more professional.
Testing Your Stream Before Going Live
Running a test stream helps you catch tech issues before your audience joins. Instead of streaming publicly, try using Discord’s “Record Only” mode or create a private channel to test everything—from system load to camera and mic sync. Monitor CPU/GPU usage and frame rate consistency.
Make sure your audio is clean and perfectly synced with the video. Tools like the NearStream Game Streaming Kit include essential hardware for running stress-free pre-stream checks. Add in the 4K60 USB 3.1 Capture Card to maintain 4K@60fps quality with ultra-low latency—even while testing.
Managing Viewers and Chat During Your Stream
Live chat is where real-time engagement shines. Use a pop-out chat window on a second monitor or separate device to ensure you catch every message. Use Discord’s voice channels to speak directly with fans or friends—it’s an instant way to build community.
Want to enhance the audio experience for both sides? Use the Portable Audio Mixer from NearStream to balance chat, gameplay, and background audio. For ultimate control over voice clarity, try the USB & XLR Condenser Microphone or the AM15X USB Microphone for plug-and-play simplicity.
Using Multiple Screens and External Mics for Better Quality
Using two or more monitors makes everything easier. Use HDMI, DisplayPort, or USB-C to extend your display—game on one screen, and control Discord and OBS on the other. Your visual and audio clarity can make or break a stream. The 4K Wired Streaming Camera VM20 gives DSLR-level sharpness and is webcam-compatible, while the VM33 10X Optical Zoom Camera captures wider shots with wireless freedom. Pair these with the Wireless Microphone AWM20T to keep your voice strong and stable, even when you’re not sitting still.
For creators seeking a full upgrade, the Streaming Kit and Podcasting Kit from NearStream offer professional solutions for audio and video streaming—ready out of the box.
FAQs About Discord Streaming
Can You Stream to Large Audiences on Discord?
No. Discord is designed for small, interactive groups. By default, a stream in a voice channel supports up to 50 concurrent viewers, including the streamer. If your server has Tier 2 Server Boosting, the limit increases to 150 viewers. Tier 3 Server Boosting allows you to stream to as many as 300 viewers. Streams at maximum capacity won't accept new members until someone leaves the session.
How Is Discord Streaming Different from Twitch or YouTube?
Discord streaming is private and community-focused, unlike Twitch or YouTube, which are designed for public broadcasting. You can only stream to people with access to your server or channel. It lacks discovery tools, thumbnails, or recommendations like public platforms offer. However, real-time interaction is a key strength—viewers can join voice chat and talk directly, making it feel more like a group hangout than a performance.
Can You Record a Live Stream on Discord?
Discord doesn’t offer built-in recording tools. To record a stream, you’ll need to use third-party tools such as OBS Studio for video or the Craig bot for audio-only recording. Be cautious—recording others without their consent may violate privacy laws. Always inform participants before hitting a record. Also, Discord does not notify users when someone uses external tools to record.
What Happens If You Lose Connection While Streaming?
Discord tries to reconnect automatically if you lose connection while streaming. Most connection problems are caused by bandwidth limits or network congestion. Streams might lag, and voice chat could sound robotic due to outbound packet loss. You can fix connection problems by lowering stream quality settings, using a wired connection, closing background apps, or updating graphics drivers. Some users with ongoing connection problems might find better stability by turning off hardware acceleration in Discord settings.
Conclusion
Streaming on Discord is a powerful way to connect, whether you're gaming, teaching, or just hanging out with friends. With easy setup, flexible sharing options, and integrated voice chat, Discord makes streaming accessible for everyone. By mastering stream quality, audio settings, and permissions, you can ensure a smooth and engaging experience for your viewers. Free users enjoy solid performance at 720p/30fps, while Nitro subscribers can unlock stunning 4K/60fps streams.
Want to take your broadcasts to the next level? Upgrade your setup with premium streaming gear from NearStream. With the right tools and settings, you’ll transform your Discord streams into interactive, high-quality sessions that bring people together in real time. Start streaming smarter today!