


In 2025, over 30% of all online content consumed globally is live-streamed, with platforms like YouTube Live, Twitch, and Facebook Live attracting more than 1.3 billion hours of watch time each month (Source: Streamlabs Industry Report, Q1 2025). Whether it’s gaming, product launches, online classes, or corporate events, live streaming has become one of the most dynamic and effective ways to engage audiences in real time.
With this surge in demand, creators and professionals alike are turning to powerful tools that offer full control over the streaming experience. OBS Studio (Open Broadcaster Software) stands out as one of the most trusted, feature-rich, and free solutions on the market — ideal for both beginners and advanced users.
What is OBS Studio?
OBS Studio (Open Broadcaster Software) is a free, cross-platform tool for video recording and live streaming. It supports all major platforms including:
- YouTube Live
- Twitch
- Facebook Live
- LinkedIn Live
- Custom RTMP servers
OBS allows you to combine multiple audio and video sources, create dynamic scenes, apply filters, transitions, and broadcast in high definition. It’s used by professionals and beginners alike for its flexibility and power.
How to Stream in OBS: Step-by-Step Setup
1. Download and Install OBS Studio
- Visit the official website: https://obsproject.com/
- Download the latest version for your system (Windows, macOS, or Linux)
Install and launch OBS Studio

2. Run the Auto-Configuration Wizard
When you first open OBS, it will prompt you to auto-configure your setup:
- Choose “Optimize for streaming, recording is secondary”
- Select your resolution and FPS (1920x1080 at 30 or 60 FPS is standard)
- Connect to your preferred streaming platform
3. Set Up Streaming Settings
Go to Settings > Stream:
- Service: Choose YouTube, Twitch, Facebook, or Custom
- Server: Leave on "Auto" unless a platform suggests otherwise
- Stream Key: Get this from your streaming platform dashboard and paste it here
Do not share your stream key — it allows full access to your channel.
4. Configure Output Quality
Go to Settings > Output > Streaming:
- Encoder: Use NVENC if you have an NVIDIA GPU, otherwise use x264
- Bitrate:
- 4500–6000 Kbps for 1080p60
- 2500–3500 Kbps for 720p30
Audio Bitrate: Set to 160 or 192 kbps

5. Adjust Video Settings
Navigate to Settings > Video:
- Base (Canvas) Resolution: 1920x1080
- Output (Scaled) Resolution: Match base resolution or lower for performance
- Common FPS Values: Choose 30 or 60 FPS depending on your hardware
6. Set Up Scenes and Sources
OBS allows multiple scenes, each with different combinations of inputs. For each scene, add the following sources:
- Display Capture: Capture your full screen
- Window Capture: Capture a specific application
- Video Capture Device: Add external cameras like the VM20 camera
- Audio Input Capture: Add microphones such as the AM25X microphone
- Audio Output Capture: Capture system audio like game sound or music
Each source can be layered, resized, and repositioned in the preview window.
7. Start Streaming
Once everything is configured:
- Click Start Streaming in the main OBS dashboard
- Your stream will begin broadcasting to your connected platform
- Monitor CPU usage, dropped frames, and bitrate in the status bar
Improving Your OBS Live Stream Quality
To stand out from the crowd, you need more than just basic video and audio. Here's how to take your stream quality to the next level.
Use the Right Bitrate and Resolution
Make sure your internet upload speed supports your stream settings:
- At least 5 Mbps for 720p30
- At least 8–10 Mbps for 1080p60
Set an appropriate bitrate in Settings > Output to match your bandwidth.

Use Scene Transitions and Hotkeys
- Add transitions like fade, cut, slide, or stinger between scenes
- Configure hotkeys under Settings > Hotkeys to switch scenes, mute audio, or start/stop streaming without mouse clicks
Use Filters to Enhance Audio and Video
- Add color correction filters to improve lighting and contrast
- Use audio filters like noise suppression, compression, and gain control for voice clarity
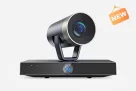
Upgrade Your Video Setup: Introducing the VM20 Camera
For professional-grade visuals, upgrading from a built-in webcam to a dedicated streaming camera makes a major difference. The VM20 camera is designed specifically for streamers and content creators.
VM20 Camera Features:
- 1080p Full HD at 60 FPS for smooth and sharp video
- Wide 90° viewing angle for full-room or studio coverage
- Built-in adjustable ring light to enhance lighting in any environment
- Auto-focus and white balance for real-time clarity
- Plug-and-play USB interface compatible with all major systems
Why VM20 Works Perfectly with OBS:
- Automatically detected as a Video Capture Device
- No drivers or extra software needed
- Compatible with OBS filters such as chroma key (green screen) and color correction
Delivers a clean video feed with low latency and high reliability

Suitable Use Cases:
- Game streaming with facecam overlays
- Online teaching or tutorials
- Product unboxings and reviews
- Virtual business presentations or webinars
Upgrade Your Audio Setup: Introducing the AM25X Microphone
Audio quality is just as important as video — and poor sound can drive viewers away fast. The AM25X microphone is a professional-grade USB condenser mic built for live streaming, podcasting, and voice-over work.
AM25X Microphone Features:
- Studio-quality sound reproduction with rich, detailed vocal tone
- Cardioid pickup pattern to isolate your voice and block ambient noise
- Built-in shock mount and pop filter to eliminate plosives and handling noise
- Low-latency headphone monitoring port for real-time feedback
- Plug-and-play USB-C interface with no drivers or mixer required
Why AM25X is Ideal for OBS Streaming:
- Instantly recognized in OBS as Audio Input Capture
- Fully compatible with OBS audio filters like noise suppression, gain, and compression
- Captures professional vocal clarity in untreated environments
Reliable for long streaming sessions with minimal noise floor

Suitable Use Cases:
- Streaming games with crystal-clear commentary
- Hosting interviews or podcasts
- Delivering online classes or corporate webinars
Recording voice-over content or promotional videos
OBS Streaming FAQ: Common Questions Answered
Q1: What is OBS Studio and why should I use it for live streaming?
A: OBS Studio (Open Broadcaster Software) is a free, open-source tool for video recording and live streaming. It supports all major platforms (YouTube, Twitch, Facebook, etc.), allows you to mix multiple video/audio sources, and offers powerful scene and filter controls. It’s used by professionals and beginners because of its flexibility and reliability.
Q2: Is OBS suitable for beginners?
A: Yes. OBS offers an Auto-Configuration Wizard that sets optimal streaming settings based on your hardware and network. Once you get familiar with scenes and sources, it becomes very intuitive. Plenty of free tutorials and community support are available online.
Q3: What camera works best with OBS?
A: The VM20 camera is highly recommended. It delivers 1080p at 60 FPS, includes a built-in ring light, and works plug-and-play with OBS. It’s ideal for gamers, educators, and content creators looking for high-quality, low-latency video without complicated setup.
Q4: What microphone is recommended for OBS streaming?
A: The AM25X microphone is a studio-grade USB condenser mic with built-in shock mount, pop filter, and cardioid pickup. It provides clear, warm vocal quality and integrates seamlessly with OBS’s audio filters like noise suppression, EQ, and compression.
Q5: How can I reduce lag or dropped frames in OBS?
A:
- Lower the output resolution and bitrate in Settings > Output
- Use hardware encoding (like NVENC) if available
- Close background applications to reduce CPU load
- Ensure your internet upload speed is stable and sufficient (at least 8 Mbps for 1080p)
Q6: Why is my screen black in OBS?
A:
- Try switching the capture source (Display Capture, Window Capture, Game Capture)
- Run OBS as Administrator
- On laptops, ensure OBS is using the dedicated GPU (set in graphics settings)