


In 2025, the podcast landscape is booming, with 584.1 million listeners worldwide. In the U.S., 55% of the population aged 12 and older tune in monthly. Podcast ad spending is projected to hit $4.46 billion in the U.S. alone(Demandsage).
As podcasts grow in popularity, multi-host shows are on the rise, offering diverse perspectives and larger audiences. However, recording a smooth, high-quality multi-person podcast can be challenging. The right tools are crucial to ensure clear audio and seamless production.
Podcasting Shouldn’t Be This Hard — Here’s a Better Way
Tired of confusing gear lists and setup headaches? You’re not alone. If you’re looking for the right podcast equipment for 2 or podcast equipment for 4, you’ve probably faced these challenges:
- Overwhelming Choices: Mics, cameras, mixers... where do you even start?
- Fear of Complexity: Will setting it up take days and require an engineering degree? (Spoiler: It shouldn't!)
- Missing Parts Nightmare: Did the tripod mount or that crucial cable get left out?
- Compatibility Chaos: Will all these pieces you bought even work together?
- Software Struggles: Is the recording software going to be impossible for you/your team to figure out?
Sound familiar? That’s why we built NearStream. Build your setup like LEG – just snap in more modules as your needs grow. Effortless, scalable, and hassle-free.
Forget the Fragmentation, Embrace the Kit:
- No more guessing: Which mic works with which mixer? Done. NearStream kits are designed from the ground up for perfect compatibility.
- No more missing pieces: Cameras, mics, mixers, stands, all cables – it’s all in your one box. Arrives in 3 days. Open it and you're ready.
- No more complexity: Our step-by-step guides actually make sense. Setup is fast, intuitive, and frustration-free for you and your team.
- No more limits: Start with a 1-person interview. Need a dynamic 2-person podcast? A full 4-person panel? Even 6 or 8? Build it like LEG. Simply snap in more NearStream modules – more mics, cameras, mixers – to create your perfect studio configuration. Effortlessly scalable.
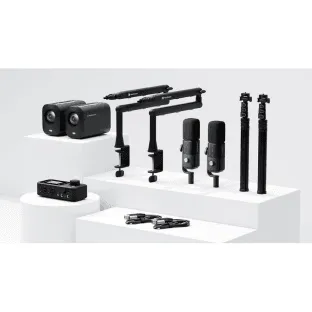
Podcast Equipment Kit for 2 or 4 Hosts
Whether you’re setting up a 2 person podcast setup or podcast equipment for 4, PodPro gives you everything you need in one box. No mismatched parts. No tech headaches. Just plug it in, hit record, and go.
🎥 For Video Podcasting
If your show is going on YouTube, TikTok, or anywhere visual—these two kits will have you looking sharp and sounding great:
PodPro Duo Video Setup for 2 Person Podcast

A perfect setup for co-hosted shows, interviews, or marketing content creation.
- 2x NearStream VM20 4K Cameras – Pro-quality video, plug-and-play USB-C
- 2x AM25X Condenser Microphones – Clear, directional sound capture
- 2x ST20 Boom Arms – Adjustable and durable for easy mic positioning
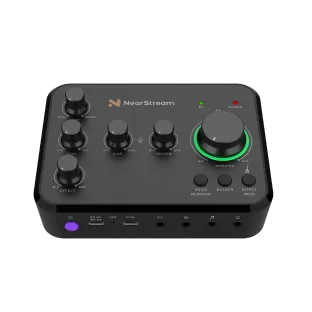
- 1x AMIX40U Audio Mixer – 4-channel mixing power, pre-balanced for simplicity
- 1x XLR Cable – For connecting both mics to the mixer
- 2x Camera Tripod Stands – Adjustable height and stable base
📦 Ideal for: Two-person podcasts, remote interviews, in-house marketing videos
Dynamic vs. Condenser Microphones: Which One’s Right for Podcasting?
| Feature | Condenser Microphone (Recommended) | Dynamic Microphone |
| Sound Sensitivity | ✅ High — captures clear, detailed vocals | ➖ Lower — focuses only on nearby sounds |
| Vocal Clarity | ✅ Crisp and warm — ideal for podcast voices | ➖ Flat or dull without close proximity |
| Background Noise Pickup | ⚠️ Higher — needs quiet room & proper setup | ✅ Lower — great in noisy environments |
| Power Requirement | ⚠️ Needs phantom power (48V) | ✅ Plug and go — no power needed |
| Handling Noise | ✅ Mounted, low handling noise with stand | ⚠️ Can be handheld, but may pick up movement |
| Best For… | 🎯 Studio podcasting, voiceover, vocal clarity | 🎤 Live shows, interviews, uncontrolled spaces |
| Used in PodPro Kit? | ✅ Yes – All PodPro kits use condenser mics | ❌ No |
PodPro Quad Video Setup for 4 Person Podcast

The all-in-one solution for group podcasts or roundtable discussions.
- 4x NearStream VM20 4K Cameras
- 4x AM25X Condenser Microphones
- 4x ST20 Boom Arms
- 2x AMIX40U Audio Mixers – Expandable and easy to balance all voices
- 2x XLR Cables
- 4x Camera Tripod Stands
📦 Ideal for: Multi-host podcasts, branded video content, panel shows
🎙️ For Audio-Only Podcasting
Not planning to use video? We’ve got leaner, more affordable options that focus purely on pristine audio:
PodPro Duo Audio Setup for 2 Person Podcast

Clean audio, no fluff—perfect for podcast beginners or remote teams.
- 2x AM25X Condenser Microphones
- 2x ST20 Boom Arms
- 1x AMIX40U Audio Mixer
- 1x XLR Cable
📦 Ideal for: Audio podcasts, remote meetings, voice-over recording
PodPro Quad Audio Setup for 4 Person Podcast

Capture everyone in the room, with studio-level clarity.
- 4x AM25X Condenser Microphones
- 4x ST20 Boom Arms
- 2x AMIX40U Audio Mixers
- 2x XLR Cables
📦 Ideal for: Roundtable podcasts, small studio setups, internal company shows
No matter which kit you choose, everything is tested for compatibility, packed with care, and comes with plug-and-play simplicity in mind. You won’t need to hunt for adapters or buy extra cables—we’ve thought of all that for you. Perfect as a podcast starter kit for 2 or 4 hosts.
2 person podcast setup Guide
No tech background? No problem. The 2 person podcast setup is designed so anyone—from a marketer to a CEO—can set it up in minutes.
Here’s exactly what to do:
🎧 Audio Setup (2 Mics + 1 Mixers)
Step 1: Mount Your Mics
Mount each AM25X condenser mic on its ST20 boom arm, then position it roughly 6–8 inches from the speaker’s mouth — slightly off-center to reduce plosive sounds like “p” and “b”.
Step 2: Connect Mics to the Mixer
Use the XLR cables to connect both mics to the AMIX40U mixer:
- Mic 1 → Channel 1
- Mic 2 → Channel 2
Phantom Power Needed:
Most condenser microphones require 48V phantom power when using an XLR connection.
Step 3: Connect Mixer to Computer
Connect the mixer’s USB or 3.5mm output to the computer’s audio input — no drivers or adapters needed.
Step 4: Adjust Gain
Press Input 1 and rotate the gain knob to about the middle position. Repeat for Input 2.
Have each speaker say “Check, one two…” and adjust the gain knobs by ear until the voice sounds clear and balanced without distortion.
Step 5: Plug in Headphones
Connect your headphones to either of the two headphone jacks on the front panel for real-time audio monitoring.
AMIX40U Pro Tips:
- Background Music Settings:
i. Short press the BGM button to activate the current channel. Press it again to switch between different BGM channels—USB OTG, Bluetooth, or AUX IN.
ii. After selecting the desired BGM channel, rotate the knob to adjust the BGM gain.
iii. Long press the BGM button to mute the selected BGM channel.- Audio Output Settings:
i. The audio output channels include: 1 6.35mm Line Out L, 1 6.35mm Line Out R, 1 3.5mm Line Out, and 2 6.35mm Headphone Monitor Out.
ii. Short press the Out button to select the current channel. Press again to switch between Line Out, Monitor 1, and Monitor 2 channels.
iii. Rotate the Output knob to adjust the volume of the selected output channel.
iv. Rotate the Monitor knob to adjust the software and hardware monitoring volume: Rotate left to increase software monitoring and decrease hardware monitoring; rotate right to increase hardware monitoring and decrease software monitoring.
v. Long press the Out button to mute the selected output channel.- FX Function:
i. After selecting the BGM channel, short press the FX button to turn the ducker function on or off.
ii. Long press the FX button to turn the Vocal Remover function on or off.
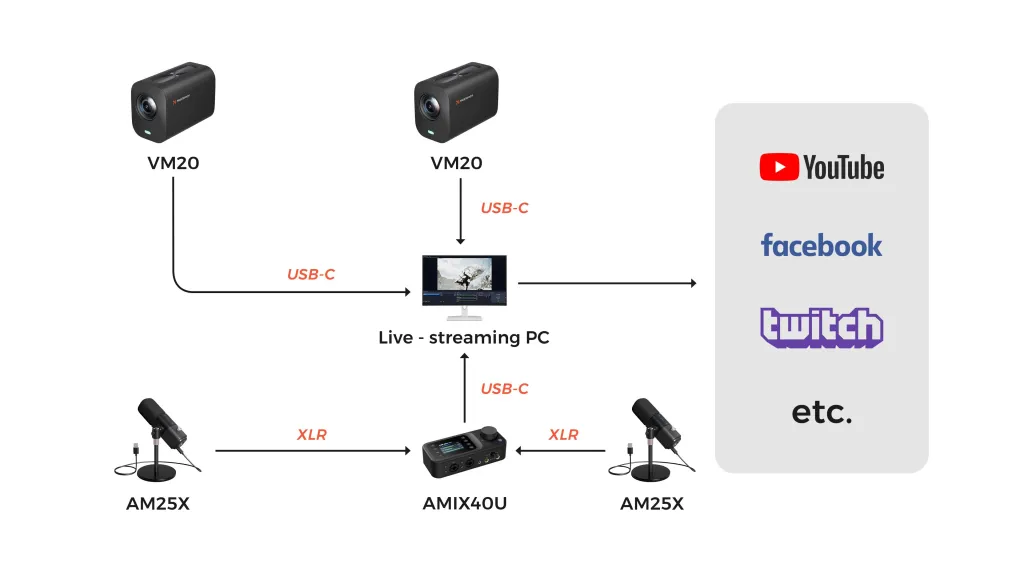
📹 Video Setup (2 Cameras)
Step 1: Position one VM20 camera on each side to capture both podcasters’ faces. Connect each camera to the computer via USB cables.
Step 2: Using the remote control, set each VM20 camera to “Device 1” and “Device 2.”
Notice: Disconnect other cameras when setting up each camera to avoid interference.

Multi camera podcast setup for 4 People
Planning a roundtable or multi-guest show? The PodPro Quad Setup makes it just as easy—just with a few more pieces. Let’s walk through it:
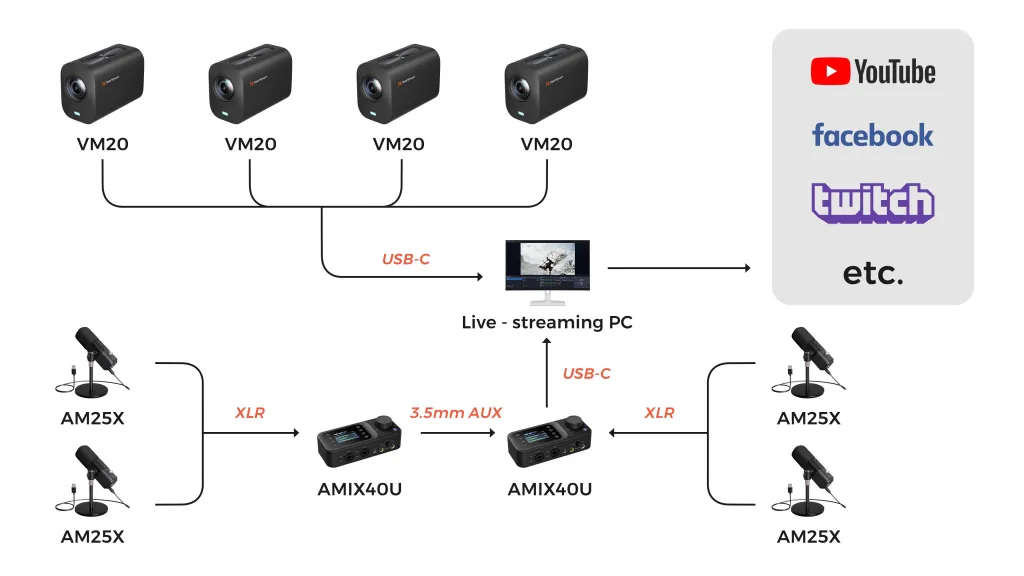
🎧 Audio Setup (4 Mics + 2 Mixers)
Step 1: Attach all four AM25X mics to their boom arms and place them in front of each speaker.
Step 2: Connect two mics per mixer using the XLR cables (so Mic 1 & 2 → Mixer A, Mic 3 & 4 → Mixer B).
Step 3: Use a 3.5mm AUX cable to connect the AUX OUT of Mixer B to the AUX IN of Mixer A.
This way, Mixer A receives all 4 channels of audio and becomes your main output source.
Step 4: Connect Mixer A to your computer using its USB interface. Your DAW or podcast recording software will capture the combined audio feed from all 4 speakers.
Step 5: Adjust gain and volume levels on both mixers. Have each person speak (“Check, one two…”) and fine-tune until all voices sound balanced and clear.
Step 6 (Optional): Want real-time monitoring for everyone?
Mixer A has two headphone jacks. For more listeners, use a headphone splitter or connect a 4-channel headphone amplifier.
📹 Video Setup (4 Cameras)
Step 1: Position four VM20 cameras on stands to capture each participant’s face.
Step 2: Connect the cameras to an HDMI switcher, then link the switcher to a CCD30 capture card connected to your computer.
Step 3: Using the remote control, set each VM20 camera to “Device 1” and “Device 2.” Repeat this process for additional devices.
Notice: Disconnect other cameras when setting up each camera to avoid interference.

Need to Go Bigger?
Hosting a 6- or 8-person podcast later on? No worries. The PodPro system scales with you—just add more cameras, mics, and an 8-channel mixer. Everything plugs in the same way. It’s like LEGO for podcasting—snap in what you need, and you’re ready to roll.
Easy Software Options: Hit Record in Minutes
Optimized for podcast equipment for 2 and podcast equipment for 4
How to Record a Podcast with Riverside.fm (Step-by-Step Guide)
Riverside.fm makes it easy to record studio-quality video and audio—right from your browser. Here’s a step-by-step guide to getting it right the first time:
Step 1: Open Riverside on Your Computer
- Go to Riverside.fm and log in to your account.
- Select Create New Recording.
Step 2: Create a New Recording Session
- Name your session for easy reference.
- Adjust streaming and recording settings to your preferences.

Step 3: Add Video and Audio Sources
- For 2P podcast
- Select two VM20s as your video sources (one for each participant).
- Choose the AMIX40U mixer as your audio source (both AM25X microphones are connected through the AMIX40U).
- For 4P podcast
- Select CCD30 Capture Card as your video source (since all VM20 cameras are routed through the HDMI switcher).
- Choose the AMIX40U as your audio source (use an AUX cable to link both mixers).


Step 4: Configure Recording Settings
- Set the video resolution to 1080p or 4K, depending on your camera’s capability.
- Enable echo cancellation and noise suppression for better audio clarity.
- Turn on separate tracks for each participant to simplify post-production editing.
Step 5: Start Recording
- Click Start Streaming/Recording in Riverside.
- Monitor audio levels using the AMIX40U mixer and adjust as needed.
- Once done, download the audio and video files directly from Riverside for easy post-production.
How to Record a Podcast with OBS Studio (Step-by-Step Guide)
Recording a podcast with OBS Studio is simple and effective. Whether you’re recording audio-only or adding a video element, OBS Studio is a powerful, free tool that gives you full control over your podcasting setup. Here’s how to get started:
Step 1: Open OBS on Your Computer
Download OBS Studio from obsproject.com and follow the installation prompts to set it up.
Step 2: Add Video and Audio Sources
- For 2P podcast
- Video Setup:
Go to Sources → Add → Video Capture Device → Select VM20.
Set one camera as “Device 1” and the other as “Device 2.”
Notice: Disconnect other cameras when setting up each camera. - Audio Setup:
Go to Sources → Add → Audio Input Capture → Select AMIX40U as the audio source (both AM25X microphones are connected through the AMIX40U).
- For 4P podcast
- Video Setup: Go to Sources → Add → Video Capture Device → Select CCD30 Capture Card as the video source (since all VM20 cameras are routed through the HDMI switcher into the capture card). Set the cameras as “Device 1”, “Device 2”, “Device 3”, and “Device 4” for each individual camera feed. Notice: Disconnect other cameras when setting up each camera.
- Audio Setup: Go to Sources → Add → Audio Input Capture → Select AMIX40U as the audio source (both mixers are connected through AUX).


Step 3: Set Up Scenes and Transitions
- Create different scenes for each podcaster’s camera feed.
- Add a two-person split-screen view for interactive moments.
- Set up smooth transitions between cameras for dynamic scenes.

Step 4: Adjust Audio Balance and Levels Using the AMIX40U Mixer
- Adjust gain levels separately for each microphone input using the AMIX40U.
- Monitor the audio mix through headphones connected to the AMIX40U.
Step 5: Start Streaming or Recording
- Click Start Streaming or Start Recording in OBS to begin capturing your podcast.
- Monitor both video and audio levels throughout the session to ensure quality.

How to Record a Podcast with Zoom (Step-by-Step Guide)
You’ve already set up your podcasting gear—cameras, mics, boom arms, and mixer are all in place. Now it’s time to hit record in Zoom and capture a professional-quality video podcast. Here’s exactly how to do it.
Zoom Settings Checklist
Before your session starts, make sure Zoom is set up to record clean, high-quality footage:
- Launch Zoom > Settings
- → Recording
- ✅ Enable “Local Recording”
- ✅ Enable “Record a separate audio file for each participant” (for better editing flexibility)
- → Audio
- ✅ Check that your AMIX40U mixer is selected as the microphone
- Optional: Enable “High-fidelity music mode” for better sound
- → Video
- ✅ Select your VM20 webcam
- ✅ Enable HD video
Pro Tip: You can rename your input devices in Zoom settings to avoid confusion—e.g., “NearStream Mic,” “VM20 Cam 1.”
Test Your Setup Inside Zoom
Before recording:
- Go to Audio Settings → Test your mic (watch the input level move when speaking)
- Go to Video Settings → Ensure your VM20 is selected and well-lit
- Click Turn On Original Sound once you join the meeting (top-left in Zoom)
🎧 Plug in your monitoring headphones into the AMIX40U mixer to catch any audio issues before you hit record.
Start the Video Podcast Recording
- Click “New Meeting” (or Join a scheduled one)
- Confirm you’re using the correct mic and camera in the lower-left toolbar
- Hit Record → Record on This Computer
- Begin your podcast session naturally—Zoom will capture both video and high-quality audio
- Need a break? Use Pause to stop temporarily without ending the session
After You End the Recording
- Click End Meeting for All
- Zoom automatically converts your files into:
- 🎬 MP4 video (for uploading to YouTube, Spotify Video, etc.)
- 🎧 M4A audio files (one per speaker, if enabled)
You’ll find your files in:
Documents > Zoom > [Meeting Name]
Buy Your Kit
Edit and Share Your Podcast
Once your podcast is recorded, editing and sharing it is the next step to get it out to your audience. Here’s how:
- Editing the Podcast:
- Open your recorded file in an audio editing software like Audacity, Adobe Audition, or GarageBand.
- Trim unnecessary sections, add intro/outro music, adjust volume levels, and improve audio quality using noise reduction and equalizer tools.
- Save the File:
Once you’re happy with your edits, save your podcast in a high-quality audio format like MP3 or WAV. - Upload and Share:
- Upload your final file to podcast platforms like Spotify, Apple Podcasts, or Google Podcasts.
- You can also upload the video version to YouTube or share clips on social media to attract more listeners.
Buy Your Kit
Ready to launch your 2 person podcast setup or podcast equipment for 4 like a pro?
👉 Unlock the Perfect Setup with PodPro Kits!

Choose your bundle and skip the hassle—no more guessing! From cables and cameras to mics and mounts, we’ve got everything you need. Simply plug in, press record, and start creating content that shines.
Don’t wait—get started now and take your podcast to the next level!
FAQ
Q1: What’s the simplest way to start a two personal podcast?
A: Use our podcast starter kit for 2 – includes mics, mixer, and cables. Plug in, record, done.
Q2: Is a podcast equipment kit for 2 compatible with Zoom?
A: Yes! Our kit connects directly to any software (Zoom/Riverside/OBS). No extra setup needed.
Q3: Why choose a podcast starter kit for 2 over separate gear?
A: It guarantees no missing cables/compatibility issues. Perfect for non-tech users like CEOs or marketers.
Q4: Can I create a multi camera podcast setup with 2 people?
A: Absolutely. Our podcast equipment for 2 includes 2 cameras – position each host for dynamic angles.
Q5: What’s included in podcast equipment for 2?
A: 2 mics, 2 stands, 1 mixer, all cables. Optional: add cameras for video.
Q5: How to frame guests in a multi camera podcast setup for two?
A: Position cameras 3-4 feet apart. Use our podcast equipment kit for 2’s tripods for stable angles.