


Lighting plays a pivotal role in video production. Whether you're a YouTuber, podcaster, or content creator, understanding the importance of lighting is crucial. One of the most fundamental lighting techniques is the 3-point lighting setup, which can transform a flat, dull image into a well-lit, professional shot.
In this article, we’ll dive deep into the 3-point lighting technique, explain how to set it up, and explore why it’s so effective for achieving well-balanced lighting.
What is 3-Point Lighting and Examples?
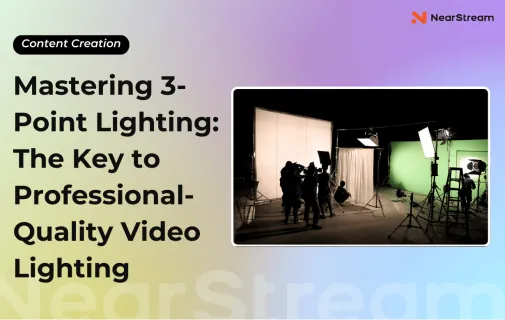
3-point lighting is a fundamental lighting technique used in photography, videography, and film production to achieve balanced, flattering illumination of a subject. As the name suggests, this setup involves three primary light sources, each serving a unique purpose to shape and define the subject’s appearance. This lighting setup is widely used for interviews, product videos, and cinematic shots.
1. Key Light
The Key Light is the primary and most powerful light in a 3-point lighting setup. It is typically positioned at a 45-degree angle to the subject, slightly above their eye level, and aimed directly at the face or body. This light is the main source of illumination and dictates the mood of the shot, as it creates the most prominent shadows and highlights.
The intensity of the Key Light can vary depending on the desired effect. A harsh Key Light will create strong shadows, making the subject appear more dramatic and intense. A softer Key Light will result in a more even, flatter look, ideal for interviews or beauty shots where you want to minimize shadows.
2. Fill Light
The Fill Light serves to soften or fill in the shadows created by the Key Light. Positioned on the opposite side of the Key Light, the Fill Light is less intense and helps to balance the contrast by reducing the harsh shadows that could otherwise obscure details of the subject’s face or body.
The Fill Light should be positioned at a lower intensity than the Key Light, ensuring that it doesn’t overpower the shadows, but instead softens them to create a more natural, evenly lit appearance. It’s important to note that the Fill Light doesn’t eliminate shadows entirely—it simply reduces their intensity, allowing for more visual detail without washing out the scene.
3. Back Light
The Back Light, also known as the Hair Light or Rim Light, is placed behind the subject and pointed toward their back or shoulders. Its purpose is to provide separation between the subject and the background, creating a sense of depth in the shot. The Back Light creates a rim effect, where light outlines the subject’s shape, especially around the edges of their hair, shoulders, and head, adding dimension to the shot.
In addition to creating separation, the Back Light adds a visually pleasing highlight to the subject, which can emphasize their features, especially in low-key lighting setups. The intensity of the Back Light should not overpower the other lights, as it should complement the Key and Fill Lights, enhancing the overall lighting scheme.

A classic example of a 3-point lighting setup is during a portrait shoot. The Key Light shines directly on the subject's face, illuminating the features. The Fill Light is softer and placed at an angle opposite the Key Light to reduce shadows. Finally, the Back Light is positioned above and behind the subject to create a halo effect, separating them from the background.

Why is 3-Point Lighting Important for Video Production?
Mood Setting: The Key Light creates the primary mood, whether it’s bright and lively or dark and dramatic.
Depth and Separation: The Back Light adds depth and separates the subject from the background, preventing the subject from blending into the scene.
Softening Shadows: The Fill Light softens harsh shadows created by the Key Light, ensuring that the subject's face and features remain visible without being overexposed.
How to Set Up 3-Point Lighting: A Step-by-Step Guide
Setting up 3-point lighting involves strategically placing the lights to achieve the right balance of light and shadow. Follow these steps for an optimal setup:
Step 1: Position the Key Light
Start by positioning the Key Light at a 45-degree angle from the subject, slightly above their eye level. The Key Light should be the brightest and most intense light in your setup, and it should focus on illuminating the subject’s face. Be mindful of its placement, as the direction of light will significantly affect how the shadows fall and the overall composition of the shot.
Step 2: Add the Fill Light
The Fill Light should be placed on the opposite side of the Key Light, at a lower intensity. The purpose of the Fill Light is to soften the shadows created by the Key Light without eliminating them entirely. You can adjust the distance of the Fill Light to ensure it balances the shadows and highlights properly. Remember, a stronger Fill Light reduces contrast, while a softer Fill Light maintains the drama and depth created by the Key Light.
Step 3: Position the Back Light
Finally, position the Back Light behind the subject, typically slightly above their head, and point it at the back or shoulders. This light creates a rim effect around the subject, separating them from the background and giving the shot more depth. Be sure the Back Light isn’t too bright; it should be subtle enough to create a halo effect without overwhelming the rest of the lighting.
What is the difference between 3-point and 4-point lighting?
The 3-point lighting setup is the foundation of most professional lighting setups, but some advanced setups include a fourth light source to enhance the scene further. The main difference between 3-point and 4-point lighting lies in the addition of the Background Light or Background Separation Light.
In a 4-point lighting setup, a Background Light is added. This fourth light is positioned to illuminate the background, helping separate the subject from it. The Background Light creates a contrast that makes the subject stand out more clearly from the background, improving the overall depth and visual interest of the shot.


Common Mistakes to Avoid in 3-Point Lighting
Overexposing the Key Light
One common mistake is using a Key Light that is too harsh or overexposed. This can result in an unnatural look, creating unwanted shadows or bright spots on the subject’s face. Always adjust the intensity of your Key Light to achieve a balanced exposure.
Not Using Enough Fill Light
If your Fill Light is too weak or absent, shadows can become too pronounced, creating a flat and unappealing look. Ensure your Fill Light softens the shadows without eliminating them completely.
Ignoring the Back Light
The Back Light is crucial for creating depth and separating the subject from the background. Without it, your subject can appear flat, and the overall image may lack dimension. Always incorporate a Back Light to enhance your setup.
Lighting the Background Too Much
While it’s important to have good lighting on the subject, overlighting the background can lead to a distracting scene. The background should complement the subject, not compete with it. Use a Background Light sparingly to highlight only the important elements.
Best Practices for Using 3-Point Lighting in Different Environments
In Studio
In a controlled studio environment, you can experiment with the intensity and positioning of the three lights. You have full control over the lighting setup, which makes it easier to achieve perfect results. In this setting, consider using softboxes for softer lighting or reflectors to reduce harsh shadows.
In Outdoor or Natural Light
When shooting outdoors or in a natural light setting, the natural light source will act as your Key Light. It’s essential to balance the intensity of your Fill Light and Back Light with the natural light. Use reflectors to bounce the natural light onto the subject for a more flattering effect.
For Product Photography
In product photography, lighting is key to showcasing the details and features of the product. Using a soft Key Light and Fill Light ensures the product’s textures and features are clearly visible, while a Back Light can be used to highlight the edges or create an outline for the product.
How to Adjust Your 3-Point Lighting for Different Video Styles
For Dramatic or High-Contrast Looks
To create a more dramatic effect, position the Key Light at a low angle, casting deep shadows on the subject. The Fill Light should be kept minimal to preserve the intensity of the shadows, and the Back Light should add a strong rim effect for separation.
For Soft and Natural Looks
For a soft and natural look, place the Key Light at a higher angle and use a soft light source, like a softbox or umbrella, to diffuse the light. The Fill Light should be strong enough to fill in the shadows but still soft, maintaining a gentle appearance.
Best Tools and Equipment for 3-Point Lighting (Recommended Kits)
1. Lume Cube Studio Panel 3-Point Lighting Kit
Best For: YouTubers, vloggers, and mobile shooters
Features: Includes three edge-lit color-temperature adjustable LED panels with built-in diffusion layers for soft and even light. Adjustable color temperature from 2700K to 7500K, built-in rechargeable batteries, and remote control for easy mobility.
💰 Price: $499.99
🔗 Link: Studio Panel 3-Point Lighting Kit | Best 3-Point LED Lighting Setup with Tripod Mounts
2. GVM 800D 3-Pack LED Lighting Kit
Best For: Budget-conscious users seeking high value
Features: Includes three RGB LED panels with adjustable color temperatures (3200K-5600K) and brightness control. Features APP control, suitable for YouTube, live streaming, product photography, and more.
💰 Price: $359
🔗 Link: GVM 800D 3-Pack LED Lighting Kit
3. Aputure STORM 80c 3-Light Kit
Best For: Professional photographers and filmmakers
Features: High-intensity adjustable white light, perfect for high-end film production. Includes Boom, dimmer, barn doors, and travel case for easy setup and transport.
💰 Price: $599
🔗 Link: Aputure STORM 80c 3-Light Kit
4. NearStream Photography Lighting Kit with Green Backdrop
Best For: Beginners and those with a limited budget
Features: Includes a 9.8ft x 9.8ft green backdrop, a 9.8ft x 8.5ft background stand support system, six backdrop clamps, two 45W LED bulbs, two 24" x 24" softboxes, a 19" panel light with remote control, three adjustable light stands (up to 6.56ft), and a carry bag for convenient storage and transport.
💰 Price: $249.99
🔗 Link: NearStream Photography Lighting Kit
5. Neewer 700W 24" Softbox Lighting Kit
Best For: Beginners and those with a limited budget
Features: Includes three 24-inch softbox lights, great for tabletop, product, and portrait photography. Provides soft lighting, reducing harsh shadows.
💰 Price: $139.99