


Podcasting is huge, with 584 million listeners worldwide in 2025. But if you’re unsure how to set up your podcast studio, you’re not alone. Don’t worry—we’ll break it down for you, step-by-step, so you can get started with confidence.
In this guide, I’m going to walk you through everything you need to know about podcast studio setup. We’ll cover everything from podcast equipment for beginners to tips on creating the perfect podcast room for your recordings. By the end of this, you’ll have all the tools you need to record like a pro.
What is a Podcast Studio and Why Do You Need One?
When you’re starting a podcast, one of the first things you’ll hear is that you need a podcast studio. But what exactly does that mean? A podcast studio isn’t just about fancy gear—it’s about creating an environment where you can record high-quality audio without distractions or background noise.
At the heart of any good podcast setup is an environment that allows you to create content without interruptions. Whether you’re recording in a cozy corner of your living room or a dedicated podcast recording studio, the space needs to be optimized for sound. In other words, your podcast room should be quiet, free of reverb, and comfortable for long recording sessions.

How to Set Up Your Podcast Recording Studio: Step-by-Step Guide
Setting up a podcast recording studio may sound overwhelming, but with the right guidance, you can get it done efficiently and effectively. Whether you’re just getting started or looking to upgrade your setup, this step-by-step guide will take you through everything you need to create a professional-sounding podcast.
Step 1: Choosing the Right Room
You don’t need a massive space to set up your podcast studio. Ideally, find a room with soft surfaces (like carpet or upholstery) to reduce echo. Avoid rooms with too many windows or hard surfaces that cause sound to bounce around.
Choosing the right space is essential to achieving high-quality sound. Here are a few tips:
- Quiet and Isolated: Your recording room should be away from noisy areas (like the kitchen or near a busy street). A bedroom or basement with minimal noise is ideal.
- Soft Surfaces: Rooms with carpets, rugs, or soft furniture are best because they absorb sound and reduce echo. If you’re in a room with hard floors, add a rug or mat.
- Avoid Windows and Open Spaces: Windows can let in unwanted noise. Opt for rooms with fewer hard surfaces to avoid reverberation.
Step 2: Arrange Your Equipment
Before we dive into setting up the perfect podcast studio setup, let’s talk about the podcasting equipment you’ll need. Don’t worry, you don’t have to break the bank to get started.
Microphone: The Heart of Your Podcast Setup
Your microphone is the most important piece of podcasting equipment. A good microphone can make or break your audio quality, and since your listeners are tuning in for the sound, it’s crucial to pick the right one.
- USB Microphones: If you’re a beginner, USB microphones like the Samson Q2U or Audio-Technica ATR2100x are perfect. They’re affordable, easy to use, and plug straight into your computer.
- XLR Microphones: If you’re aiming for higher quality sound, an XLR microphone like the Shure SM7B is a great choice. These require an audio interface to connect them to your computer, but they provide superior sound quality.
If you want to take your podcasting audio quality to the next level, consider the NearStream AM25X. It offers Dual-Mode Flexibility, meaning you can use it as a USB plug-and-play microphone (no audio interface needed) or as an XLR pro-grade microphone for top-tier sound.

Headphones: For the Best Sound Monitoring
It’s easy to overlook headphones, but they’re just as important as your microphone. You’ll need over-ear headphones that can block out external noise while allowing you to hear every detail of your recording.
- Audio-Technica ATH-M50X is a popular choice for podcasters due to its comfortable fit and clear sound.
Audio Interface: For Higher-Quality Sound
If you’re using an XLR microphone, you’ll also need an audio interface to connect your microphone to your computer.
- The Focusrite Scarlett 2i2 is a reliable and affordable choice that delivers professional-quality sound without any hassle.
Mixer: Optional But Helpful for Professional Control
A podcast mixer gives you more control over your sound. While it’s not strictly necessary, it can be helpful if you plan on adding music, sound effects, or if you have multiple microphones in your setup.
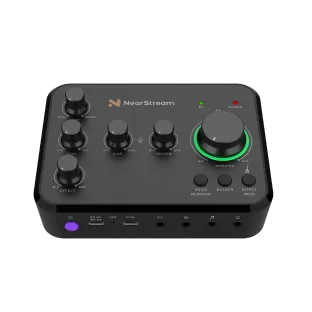
- The NearSteam AMIX40U is a small, budget-friendly option.
Pop Filter: A Simple Tool for Cleaner Sound
A pop filter is a must-have to reduce those annoying popping sounds that happen when you say words like “pop” or “book.” They’re super affordable and will save you a lot of headaches in post-production.
Feeling overwhelmed? Don’t know how to choose the right equipment?
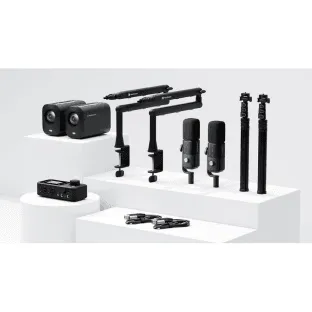
Check out NearStream’s PodPro Solution—we’ve got you covered with the NearStream Modular Podcasting Kit. This kit is a complete podcast setup solution designed for creators, educators, and business teams. Whether you’re recording a solo show, hosting a two-person interview, or running a full panel, this podcast starter kit scales with your needs.
| Product | Features |
| VM20 4K Camera | Delivers stunning 4K clarity with powerful 40X hybrid zoom and stable wired connections (HDMI/USB/RJ45) for professional-grade streaming and recording. |
| AM25X Condenser Mic | Professional-grade audio with supercardioid capsule. Dual USB/XLR, AI noise reduction, one-tap mute, and real-time monitoring for flexible use in both digital and studio setups. |
| ST20 Boom Arm | Adjustable, sturdy arm for flexible mic placement and a clean desk setup. |
| AMIX40U Audio Mixer | All-in-one mixer with dual XLR/6.35mm inputs, real-time monitoring, 48V phantom power, and multi-device support via USB, AUX, and OTG. Ideal for portable recording and livestreaming. |
| XLR Cables | Professional-grade balanced cables for clean, interference-free audio connections. |
| Camera Stand | Solid, adjustable stand to ensure optimal framing and camera stability during sessions. |
The NearStream PodPro Bundle includes everything you need for an effortless podcasting experience. From high-quality microphones to audio interfaces, our bundle is the perfect podcast equipment for beginners, making it easy to create a professional-sounding podcast right out of the box. No more stress about picking individual components—just focus on creating great content!
Step 3: Optimize the Sound
Soundproofing your space will dramatically improve the quality of your recordings. Here’s what you can do:
- Acoustic Foam Panels: These are affordable and can be mounted on walls to absorb sound and prevent echoes. You can place them at reflection points in your room—like behind your microphone and around your recording area.
- Heavy Curtains or Blankets: Hang heavy curtains or blankets on windows and doors to further reduce outside noise and reverb. You can also use them to create a “DIY” sound booth.
- Seal Gaps: Check for any gaps around doors or windows where sound might leak through. Use weatherstripping to seal them up.
Step 4: Test Your Gear
Before you jump into recording, it’s crucial to test everything:
- Set Levels: Adjust your microphone’s gain and audio interface levels to avoid distortion or clipping. You want the levels to be loud enough without peaking into the red.
- Test Your Mic Placement: Position the mic at an arm’s length away from your mouth. Too close, and it can pick up too much breath noise; too far, and your voice won’t sound clear.
- Check for Background Noise: Do a test recording to check for background noise. If there’s humming or buzzing, troubleshoot the power sources or cables.
Make sure everything sounds great before proceeding to record your podcast.
Step 5: Choose a Podcast Hosting Service
After your recording setup is ready, you’ll need a place to host and distribute your podcast episodes. Here’s how to choose the right podcast hosting service:
- Storage and Bandwidth: Look for a hosting service that offers enough storage for your audio files and the bandwidth needed to handle large downloads. Popular podcast hosting platforms include Buzzsprout, Libsyn, and Anchor.
- RSS Feed: Ensure that the hosting service provides an RSS feed for distribution to platforms like Apple Podcasts, Spotify, and Google Podcasts.
- Analytics: Choose a hosting platform that offers detailed analytics, so you can track your podcast’s performance—such as how many people are listening, where they’re located, and what episodes are most popular.
If you want a truly free hosting option, consider Anchor. It’s an easy-to-use service that also distributes your podcast to all major platforms automatically.

Step 6: Add Some Basic Podcasting Software
Now that your physical setup is complete, you’ll need some software to help with recording and editing:
- Recording Software: Audacity and GarageBand are great free options for recording. If you’re looking for more advanced tools, try Adobe Audition or Reaper.
- Editing Software: Editing is where you can refine your podcast audio. Use editing software to remove background noise, cut unnecessary sections, and improve overall audio quality.
Step 7: Start Recording!
Once everything is set up, it’s time to record your first episode! Make sure to stay relaxed, speak clearly, and remember to pause if you need to gather your thoughts.
Pro Tip: Always back up your recordings to a cloud storage service like Google Drive or Dropbox to prevent any potential data loss.
Step 8: Publish and Promote
After editing your podcast, upload it to your hosting service. Be sure to add your podcast title, description, and any relevant tags. When it’s published, share it on social media, your website, and with your email list to start growing your audience.
FAQs: Setting Up Your Podcast Studio
1. What equipment do I need to start a podcast?
To start a podcast, you need at least a microphone, headphones, and recording software. A basic USB microphone is ideal for beginners. You can upgrade as you grow.
2. How do I choose the right microphone for podcasting?
For beginners, a USB microphone is often the easiest and most affordable choice, as it plugs directly into your computer. If you’re looking for better sound quality and more control, an XLR microphone paired with an audio interface is a great upgrade.
3. Can I record a podcast without a studio?
Yes! You don’t need a professional studio. Any quiet room with soft furnishings like curtains or carpets can work. The key is to reduce background noise and echo.
4. How do I reduce background noise when recording at home?
To minimize background noise, record in a quiet room, use foam panels or blankets to absorb sound, and ensure your microphone is set up properly to pick up only your voice.
5. What is the best free software for podcast editing?
Audacity and GarageBand are great free options for editing your podcast. Both are user-friendly and allow you to clean up audio, cut unwanted parts, and add effects.
6. How can I host my podcast for free?
Platforms like Anchor or Podbean offer free hosting for your podcast. They even distribute your show to popular platforms like Apple Podcasts, Spotify, and Google Podcasts.