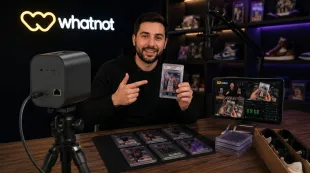


Viewers retain 95% of a message when it’s delivered via video, then 10% through text. That’s why brands use talking head videos, authentic, face-to-camera content that creates an instant human connection. These short, impactful videos dominate feeds on TikTok, Instagram Reels and YouTube Shorts, where attention spans disappear in seconds.
A talking head video shows your face and voice, helping people trust your brand and feel more connected. And best of all, they’re affordable, just a smartphone, a clear script and a microphone. But creating one that holds attention? That’s an art. With the right structure, dynamic editing and purposeful delivery, talking head videos turn casual viewers into loyal customers. This article will show you how to create a talking head video, branded interviews and face-to-camera content that leaves a lasting impression.
What is a Talking Head Video?
A talking head video is a form of content that centers on an individual speaking directly to the camera. It originated in the 1960s, primarily in news broadcasts, where anchors would appear on screen in close-up shots. Today, this simple format is used across industries, from education and marketing to social media and corporate training.
The real power of this format is the direct, personal connection it creates with the viewer. Whether it’s an expert sharing insights, a CEO delivering a message, or a YouTuber talking to their followers, talking head videos feel like one-on-one conversations.
Understanding Talking Head Style
A talking head style video typically shows a person speaking straight to the camera, usually framed from the shoulders or chest upward. The subject sits or stands against a simple background, creating an intimate one-on-one feel with the viewer. The focus is on the speaker’s face, gestures and message without distractions. The style feels like a personal conversation, as if the speaker is talking to each individual viewer.
Talking Head Definition & Common Formats
A talking head video is a type of footage where a presenter, expert, or interviewee addresses the audience by speaking directly to the camera or slightly off-camera. Common formats include:
Solo presenter videos: A single person addresses viewers directly
Interview-style: Features conversation between host and guest
Expert commentary: Subject specialists explaining concepts
Picture-in-picture: Speaker appears alongside visuals or demonstrations
Documentary-style: Talking heads interspersed with B-roll footage
These videos can be standalone content or incorporated into larger productions as explanatory segments.
Why Talking Head Videos Work for Creators and Brands?
Talking head videos build trust through human connection. Studies show that using a person speaking on screen (talking head) and helpful visuals in video lessons leads to better learning, keeps viewers watching longer, and boosts engagement. Plus they:
Create authentic connections through facial expressions and body language
Deliver complex information in bite-sized chunks
Humanise brands by putting a real face to the company name
Affordable production options requiring minimal equipment
Microlearning through bite-sized content
For brands looking to establish credibility and personal connections, talking head videos are an accessible yet powerful medium that works across multiple platforms.
Types of Talking Head Videos and Interviews

Talking head videos come in several formats, each serving specific communication needs for brands and creators. Knowing these variations helps you choose the right approach for your goals.
1) Solo Talking Head Videos
Solo talking head videos feature a single presenter speaking directly to the camera, generally framed from the chest or shoulders up. This format creates an intimate one-on-one feel with the viewer that’s perfect for building trust. The presenter is usually centered in the frame and maintains eye contact with the audience throughout the video.
Use cases: tutorials, product demos, thought leadership...
Solo talking head videos work well in:
Explainer videos where subject matter experts break down complex topics
Corporate communications for company updates and announcements
Educational content, including lectures and instructional videos
Product demonstrations that showcase features and benefits
Thought leadership videos establish industry authority and expertise
These videos humanise brands by putting a real face to the company name, making them great for establishing credibility and audience connection.
2) Talking Head Interview
Unlike solo formats, talking head interviews involve conversation between two or more people. These typically use the "rule of thirds" for framing, placing subjects slightly off-center and looking toward the interviewer rather than directly at the camera. This creates a natural conversational feel that audiences find engaging and authentic.
When to use: expert interviews, client success stories, industry panels...
Interview formats work exceptionally well for:
Expert Q&As with thought leaders or specialists
Client testimonials that provide social proof and trust
Employee features to showcase the company culture
Executive interviews for transparent leadership communication
Panel discussions exploring key trends and shared experiences
This format works well when you want to present credibility, gather insights, or foster deeper storytelling.
3) 'Video of Somebody Speaking' in Documentary or talking heads Film Style
Documentary-style talking heads incorporate cinematic techniques that elevate production value. These videos often use the "off-off-camera" approach where neither interviewer or interviewee appears on screen simultaneously, with the participant's voice serving as narration over supplementary footage.
Incorporating talking head interviews into storytelling or branded documentaries
This approach works particularly well for brand storytelling by:
B-roll footage to illustrate what the speaker is talking about
Lower-third titles to provide speaker identification and context
Multiple camera angles to enhance visual engagement
Authentic stories that emotionally resonate with the audience
Each format offers distinct advantages depending on your communication goals, available resources, and intended audience.
How to Create Professional Talking Head Videos
Making professional talking head videos involves more than just pressing the record button. It’s about thoughtful preparation, solid technical execution, and a presentation style that connects with viewers. Whether you’re building brand content, delivering tutorials, or just sharing insights, these videos should look polished and sound clear. Here's how to make that happen.
1) Pre-Production Essentials
The success of any talking head video begins long before the camera starts recording. Effective pre-production planning serves as the foundation that determines whether your final product will engage viewers or fall flat.
Scripting and key message preparation
Successful talking head videos begin with well-written scripts that clearly communicate your message. First, define your objectives by asking yourself: What is the purpose of this video? Who is your target audience? What action should viewers take after? Which platform will the content be hosted on? Answering these questions helps you determine the tone and structure of your script.
For best results, structure your script using the basic plot framework:
Introduction – Introduce yourself, company or topic
Hook – Capture attention with a question or eye-opening statistic.
Rising action – Deliver your main points in sequence
Climax – Summarise key takeaways
Resolution – End with a clear call-to-action
Note: Conversational language works best for talking head videos. Write as you speak unless technical jargon is necessary for your audience. Focus on one message, trying to cover too many topics usually dilutes the impact and confuses viewers.
Choosing the speaker and setting
The presenter in your talking head video must connect with the viewer. During casting, consider:
Subject matter expertise
On-camera presence and confidence
Speaking clarity and pace
Ability to convey emotion and enthusiasm
Then choose the right filming environment. Unlike earlier approaches where studio settings were used, today’s viewers respond better to real backgrounds that match the content’s context. Primarily choose quiet locations with minimal distractions that won’t compete visually with the speaker.
Create a detailed storyboard with shot lists to visualise the final product before filming begins. This also helps plan visual elements like props, graphics and background requirements so everything is ready on filming day.
2) Camera Setup: Best Angles and Framing
The positioning of the camera plays a vital role in the effectiveness of any talking head video. The technical aspects of camera setup might seem minor but they greatly affect how audiences perceive your content and engage with the speaker.
Eye-level framing
Framing the camera at eye level creates a natural, conversational feel in talking head videos. This makes the viewer feel like they’re conversing with the speaker face-to-face, increasing engagement and trust. When filming, position the camera slightly above eye level to create a realistic perspective that encourages connection.
Don’t position the camera too low (which creates an unflattering “up-the-nose” angle) or too high (which can make the subject appear diminutive or less authoritative).
Rule of thirds vs centered shot, depending on style
The rule of thirds divides the frame into a 3×3 grid, placing the subject along these lines or at their intersections. For interview-style talking head videos where the subject looks off-camera, position them on either the left or right third of the frame, leaving “negative space” in the direction they’re looking. For direct-to-camera addresses, centered framing often works better, creating a balanced composition that emphasizes the speaker’s authority and connection with the viewer.
A professional touch is to have headroom – about 2 inches (or 2 finger widths) between the top of the subject’s head and the top of the frame. This prevents wasted space and doesn’t crowd the subject in the frame.
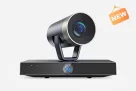
Recommended gear: streaming camera for flexible studio or on-the-go talking head setups
For high quality talking head videos, consider:
Sony A6400: Excellent autofocus, flip screen, great video quality
Canon M50 Mark II: User friendly with vari-angle touchscreen (although recently discontinued)
Panasonic Lumix GH5: 4K/60fps, in-body stabilization, great low light performance
For beginners or those on a budget, the NearStream VM20 4k streaming webcam with remote control is surprisingly good, mainly for indoor setups. So, regardless of camera choice, investing in a tripod is vital. Steady footage is non-negotiable for professional-looking content.
3) Audio Setup for Crystal Clear Speech
Audio quality often makes or breaks talking head videos, with many viewers more likely to forgive visual flaws than poor sound. Selecting the right equipment ensures your message comes through with crystal clarity. NearStream offers a suite of solutions designed specifically for creators who prioritize audio quality in their video production.
Explore full gear bundles like the Podcasting Kit, Interview Kit, or Streaming Kit for professional-grade setups tailored to your needs.
Lavalier vs shotgun vs dynamic mic
Each microphone type serves distinct purposes in talking head production:
Lavalier Microphones: Ideal for creators who move during recordings, lavaliers provide discreet and reliable vocal capture. The NearStream AWM20T Wireless Lavalier Microphone is perfect for mobile setups, offering wireless flexibility while maintaining consistent vocal clarity. Clip it 6–8 inches below the chin, either visible or concealed, for optimal results.
Shotgun Microphones: If you’re working in a controlled environment and want to minimize background noise, shotgun mics are great. They capture sound directionally and reject off-axis noise, making them good for interviews and solo recordings. Mount them just out of the camera frame, about 6-18 inches above the mouth, for best audio quality.
Dynamic Microphones: Dynamic mics outperform condensers for untreated or noisy spaces due to their lower sensitivity. Models like the Shure SM57-LC or NearStream's AM15X USB Microphone offer studio-grade sound that minimizes ambient interference. These are great when the mic is on camera and close to the speaker.
Need a versatile upgrade? Consider the USB & XLR Condenser Microphone AM25X for flexible use cases in both streaming and podcasting setups.
When to Use Audio Mixer
An audio mixer becomes essential if your production involves more than one audio source, such as a voice mic, music, or sound effects. The NearStream AMIX40U Portable Audio Mixer is ideal for balancing multiple inputs while allowing on-the-fly adjustments during recording.
The NearStream AMIX20B seamlessly integrates mic feeds and other audio sources for more advanced control. Visual level meters ensure that speech remains dominant in the mix, especially when adding background music or system sounds. This is critical for maintaining a polished audio experience.
Gamers and DSLR users will also benefit from the 4K60 USB 3.1 Capture Card for latency-free, high-resolution recording.
Pro Tip: Audio is half your video. Make it a priority, monitor its quality, and invest in the right equipment to keep your audience engaged and connected.
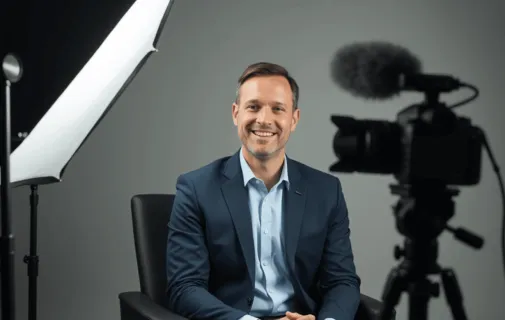
4) Lighting Setup to Make the Speaker Look Great
Lighting often determines whether a talking head video appears amateur or professional. Proper illumination not only enhances visibility but also shapes the viewer's perception of both the speaker and the content.

3-point lighting for even, flattering exposure
The three-point lighting setup remains the gold standard for talking head videos, creating dimension and flattering exposure:
Key Light: Positioned approximately 45 degrees to one side of the subject and 45 degrees above eye level, this primary light source illuminates the main features of the speaker's face. The key light creates the primary brightness while establishing intentional shadows for dimension.
Fill Light: Placed on the opposite side of the key light, this secondary light softens shadows created by the key light without eliminating them completely. Typically set at half the intensity of the key light, it prevents harsh contrasts while maintaining depth.
Backlight: Positioned behind the subject and opposite the key light, it creates a soft rim of light around the shoulders and hair, helping to visually separate the speaker from the background. This prevents the flat "cut-out" look that occurs without proper depth.
Use of softboxes or key light + bounce for smaller spaces
Tight spaces needn't compromise lighting quality. For confined areas:
Use softboxes to diffuse harsh light sources, spreading illumination evenly across the subject. Softboxes or ring lights create attractive, shadow-free lighting that flatters speakers.
In extremely limited spaces, bounce lighting offers an excellent alternative. Just aim a light at a white wall or ceiling to turn it into a broad, soft light source. Be sure to avoid colored walls, as they can reflect unwanted hues onto your subject.
For budget-friendly solutions, household items work surprisingly well – a white bed sheet hung in front of a harsh light creates effective diffusion, while white poster board makes an excellent reflector for fill light.
Remember that lighting primarily directs viewer attention. Poor lighting allows attention to wander, ultimately reducing engagement in your talking head content.
Recording and Editing Tips for Talking Head Videos

Execution and refinement transform raw talking head footage into engaging final content. Once your setup is complete, attention shifts to capturing quality footage and enhancing it through strategic editing.
1) Best Practices During Recording
The foundation of an engaging talking head video is authentic communication. Looking directly into the camera mimics real eye contact with the viewer, fostering a sense of trust and personal connection. To support natural delivery, a teleprompter app can keep your script close to the lens without distracting from performance.
Recording multiple takes gives you flexibility during the edit, different expressions, phrasings, or emotional deliveries. If you’re filming an interview, chat casually before you begin; this helps subjects relax and appear more natural on screen. Encourage them to repeat the question in their responses. It might feel redundant, but it makes editing easier and gives the viewer more context.
2) Multi-Camera Angles for Dynamic Interviews
A single-camera setup might work, but adding a second camera instantly elevates your content. Use one for a medium shot and another for close-ups. Keep both cameras on the same side of the 180-degree line to preserve spatial consistency.
Position your cameras no more than 35 degrees apart to create visual variety without disorienting the viewer. Picture your subject at the center of a clock: place one camera at 12 and the other somewhere between 10 and 12. Varying focal lengths (wide vs. telephoto) adds depth and dimension to your edits without breaking the viewer's focus.
3) Post-Production Touches
Editing is where your footage transforms into a cohesive, professional story. Here are the key elements to consider:
Clean Cuts, Add Lower Thirds, Captions
Start your editing process by eliminating mistakes and awkward silences. Use seamless transitions to preserve the flow. Introduce lower thirds to identify speakers or highlight important data points. Captions are a must; about 70% of users watch with the sound off, and captioning can boost engagement by up to 80%.
Brand Overlays and Call-to-Actions
Your brand identity should be clear and recognizable, but not overpowering. Insert logo watermarks or subtle overlays throughout the video. Highlight key messages or insights using bold text callouts. For viewer engagement, animated call-to-action (CTA) buttons like "Subscribe" or "Learn More" are ideal, especially on platforms like YouTube and Instagram.
Use Split-Screen for Interviews When Needed
Split-screen formats are particularly useful in remote interviews or panel-style content. Displaying the interviewer and the guest simultaneously can build rapport with the audience and replicate a face-to-face interaction. This approach works great for podcasts, webinars, and collaborative discussions, giving your video a polished, professional feel.
Use Cases for Talking Head Videos in 2025
Talking head videos have grown beyond corporate presentations. In 2025, they will shape education, marketing, and storytelling across various industries. Their flexibility makes them a go-to format for personal, informative, and visually focused content.
Social Media Campaigns (YouTube, Instagram, LinkedIn)
Talking head videos dominate TikTok, Instagram Reels, YouTube Shorts, and LinkedIn. Short-form face-to-camera videos are perfect for product reviews, tutorials, customer testimonials, Influencer partnerships, and brand messages.
The key advantage is authenticity. Direct eye contact and natural speech help create a personal connection with viewers, making brands feel more human and relatable.
Virtual Events, Webinars, and Workshops
Corporations increasingly rely on talking head videos to communicate mission statements, showcase expertise, and deliver training. Educational platforms use this format to walk through tutorials, combining screencasts with dynamic host commentary.
For instance, companies like HubSpot integrate talking heads with B-roll and animations to enhance their online workshops. Interviews with thought leaders or clients can be edited into video snippets that enrich event content and provide social proof.
Sales and Onboarding Videos
Talking head videos streamline both internal and external communications. On the sales side, they add a personal touch to outreach efforts. Videos humanize the sales message and establish credibility, whether included in email pitches or landing pages.
For internal use, onboarding videos introduce new employees to company culture, leadership, and workflows. Subject matter experts appearing on camera can quickly get new hires up to speed in a consistent and scalable way.
Documentary and Brand Storytelling Series
Brands are embracing storytelling like never before. Talking head segments are now central to mini-documentaries, behind-the-scenes features, and customer success stories. This format allows for emotional connection and deeper insight into brand values.
For example, Eagle Builders uses interviews and facility walkthroughs to tell a cohesive story about their operations and vision. Talking heads can also be paired with compelling B-roll to spotlight achievements, innovations, or milestones in a humanized way.
Cost Breakdown for Talking Head Video Setups (Solo vs Interview)

The investment required for talking head video production varies dramatically based on quality expectations and production complexity. Primarily, the right equipment depends on your specific content goals rather than simply spending the most money possible.
Basic Creator Setup ($200–$500) Webcam, USB mic, basic lighting
For beginners creating talking head videos on tight budgets, entry-level equipment delivers surprisingly good results:
Camera: Smartphone with Camo Studio app or budget webcam
Audio: USB microphone like Audio-Technica ATR2100x ($80)
Lighting: Simple ring light or energy-efficient LED bulbs
Editing: Free software like iMovie (Mac) or YouCut (PC)
At this tier, mastering fundamentals—proper framing, clean audio, and adequate lighting—matters more than expensive gear. Remarkably, this setup produces professional-looking content while staying under $500.
Mid-Tier Setup ($500–$1,000)
As channels grow, creators typically upgrade to more specialized equipment:
Camera: The Sony ZV-1 remains a popular choice, while the NearStream VM20 4K Streaming Cam stands out for its exceptional value. It's perfect for interviews with dual 4K streaming cameras, 10x optical zoom, tripod mounts, and a free multi-cam app.
Audio: For studio-grade vocals, add a Wireless Microphone (AWM20T) for vlogging or upgrade to the professional USB&XLR Condenser Microphone AM25X.
Lighting: Choose app-controlled panels like Elgato Key Light Air or similar LED setups for customizable lighting scenes. Another excellent choice is NearStream VK40 kit which combines both remote-controlled panel, LED bulbs and green screen background, perfect for photo or video shooting.
Editing: Use more advanced tools like Final Cut Pro or Adobe Premiere for richer edits.
This tier represents the sweet spot for serious content creators, balancing professional quality with reasonable investment.

Pro Studio Setup ($1,500+)
For professional brand videos and commercial productions, comprehensive setups include:
Camera: Sony A7iv ($2,498) or Panasonic S1H with high-quality lens
Audio: Professional microphones (Shure SM7dB at $500), audio mixer (NearStream AMIX20B)
Lighting: Three-point lighting system with Amaran 100x S Light ($249) and softboxes
Additional: Teleprompter ($149), video switcher, capture cards, multi-extension cords
The pro setup facilitates multiple camera angles, professional audio mixing, and superior lighting control—essential elements for high-end talking head interviews and corporate video production.
Bonus Tips to Level Up Your Talking Head Content
Beyond technical setup, small refinements often determine whether a talking head video succeeds or fails. These practical tips help elevate content quality without requiring expensive upgrades.
1) Engage with Your Audience Through Eye Contact and Energy
Looking directly into the camera makes your audience feel like you're talking to them. It builds trust and connection. You can use a teleprompter app near the lens to help maintain eye contact while speaking. Also, speak a bit slower than usual so people can easily understand you. Most importantly, keep your energy up! Viewers enjoy content more when the speaker is lively and enthusiastic.
2) Use Visual Aids and Cutaways to Avoid Monotony
Just watching a person talk for several minutes can get boring. To keep things interesting, add helpful visuals like images, short video clips, or on-screen text to highlight important points. You can also include a video table of contents with markers to help viewers skip to sections they care about. These extras break up the video and keep people watching.
3) Optimize Audio First—Audiences Forgive Video Flaws but Not Poor Audio
Good sound is more important than perfect video. People will still watch if the video isn’t perfect, but they’ll stop watching if the sound is bad. Record in a quiet room and avoid spaces that echo. Place your microphone properly, if it’s a clip-on mic, it should sit about 6-8 inches below your chin. Clear audio makes your video feel professional and easy to follow.
4) Always Shoot Backup Audio and Video
Things can go wrong during filming, so it’s smart to have backups. Record extra audio just in case your main audio fails. If possible, shoot from a second camera angle too. After filming, backup your files right away. This way, you won’t lose everything if something goes wrong.
Conclusion
Talking head videos and interviews provide brands with a powerful and authentic way to engage their audience. By combining clear messaging, compelling delivery, and proper production techniques, these videos can build trust, drive engagement, and enhance brand credibility. While high-end gear can help, even basic setups deliver strong results when lighting, audio, and scripting are done right. Interviews, in particular, add human insight and relatability that amplify storytelling. Regardless of budget, the key is consistency and clarity. With the right tools and a focus on authentic communication, brands can turn simple video formats into powerful marketing assets.
Ready to elevate your talking head videos? Explore professional gear options at NearStream to enhance your video production today!