


Whether you’re launching a YouTube channel, filming a product review, or documenting your day, making a homemade video has never been more accessible — or more important. The tools to create high-quality content are now affordable and beginner-friendly. But without the right approach, even the best equipment won’t save your video from looking flat or sounding unclear.
In this guide, we’ll walk you through everything you need to create great videos from the comfort of your home — from essential gear and lighting tips to practical filming strategies and common mistakes to avoid.
Why Homemade Video Content Is More Relevant Than Ever
The demand for homemade video content has surged in recent years — not just among YouTubers, but also in business, education, social media, and remote communication. In a post-pandemic world where audiences are more accepting of informal, authentic setups, home videography has become a core skill for creators of all kinds.
Why is this trend growing?
Affordability: With smartphones and basic gear, anyone can start.
Authenticity over perfection: Viewers crave realness more than polish.
Flexibility: No need for fancy studios or rentals.
Reach and monetization: Platforms like YouTube, TikTok, and Instagram Reels reward good storytelling regardless of production scale.
What You Need to Film a Video at Home: Essential Gear & Setup
Filming at home doesn’t mean you have to compromise on quality. With the right gear and setup, you can produce professional-grade videos from your bedroom, living room, or even a corner of your kitchen. The key is to maximize quality within the limitations of your space.
Essential Gear Checklist
● Camera / Webcam
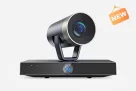
Your built-in laptop cam won’t cut it. Using an exquisite streaming camera can enable you to obtain better image quality within a reasonable budget
● Microphone
Audio is half the video. A condenser mic gives you crisp vocals and eliminates background noise — essential for talking-head videos, tutorials, and voiceovers.
● Lighting
A ring light or LED panel placed at eye level will dramatically enhance your appearance and reduce harsh shadows. Natural light can work, but it’s inconsistent.
● Tripod or Mount
Stability matters. Avoid shaky handheld shots by using a sturdy tripod or desktop mount.
● Backdrop or Framing
Choose a clutter-free background or hang a fabric backdrop to control the visual context. A simple bookshelf or solid color wall works well too.
Lighting Tips for Home Filmmaking: Natural Light vs. Artificial Light
☀️ Natural Light: When and How to Use It
Shoot near windows — ideally with soft daylight, not harsh direct sun.
Use sheer curtains to diffuse strong light and reduce contrast.
Best time: Morning or late afternoon (golden hour).
Avoid overhead lighting — it casts unflattering shadows on the face.
💡 Artificial Light: Ring Lights, LED Panels & More
When natural light isn’t enough or isn’t consistent, artificial lighting is your best friend. Here’s how to do it right:
Use a key light at 45° angle from your face.
Fill shadows with a softer fill light or bounce surface.
Use a backlight (optional) to separate yourself from the background.
Adjust white balance on camera or software.

Framing, Angles, and Background: How to Make Your Home Look Like a Studio
Framing: Rule of Thirds Works Every Time
Divide your screen into three vertical and three horizontal sections — like a tic-tac-toe board. Placing your eyes or subject at the intersection points creates a more visually appealing composition. Most modern cameras have a built-in grid option to help you frame better.

Camera Angle: Eye-Level is Best
The camera should be aligned with your eye level, especially for talking-head or vlog-style videos. Shooting from below can feel awkward or intimidating, while too high may disconnect you from the viewer.
*Use a tripod or stack of books to adjust height as needed.
Background: Less Clutter, More Focus
Avoid messy or overly detailed backgrounds. A simple bookshelf, a clean wall, or a hanging cloth backdrop works best. If you're filming in a multipurpose space, try to isolate one corner visually.
Tip: Add depth by placing something behind you, like a lamp or plant, to separate yourself from the wall. This gives a cinematic effect.
How to Capture Clear Audio When Filming at Home
🎤 Why Built-in Mics Don’t Cut It
Laptop and camera microphones pick up everything — keyboard sounds, AC noise, distant echoes — and they usually lack the sensitivity and range to deliver crisp, balanced voice.
Recommended condenser microphone ⬇️
Microphone | Best For | Price Range | Notable Features |
Voice recording, talking head videos | $84.99 | Plug-and-play, built-in noise reduction, directional audio | |
Streaming, podcasting | $99.99 | Multiple pickup patterns, good sound for price | |
YouTube, vocals | $99 | Compact size, solid audio clarity | |
Live streaming | $149.99 | Clip guard tech, digital mixing software | |
Budget creators | $31.99 | Very affordable, decent clarity for the price |
Step-by-Step: How Do You Make a Video from Start to Finish?
📝 Step 1: Plan Your Content
Think about what you want to say and shoot. Write a simple script or outline, and decide on:
The topic and main objective of your video
The basic structure (intro – body – conclusion)
Visual elements or B-roll you might need
🎬 Step 2: Set Up Your Filming Space
Choose a clean, quiet space with good lighting. Mount your camera on a tripod, check the frame, and test your mic and lights.
🔴 Step 3: Record the Footage
Record in sections if needed. Speak naturally, look at the camera, and aim for clarity, not perfection. Retake anything that feels off.
✂️ Step 4: Edit Your Video
Use free or pro editing tools (CapCut, Premiere, Final Cut Pro, etc.) to:
Trim unnecessary clips
Adjust brightness and contrast
Add subtitles, music, or transitions
Sync your audio and clean up noise
📤 Step 5: Export and Upload
Export your video in MP4 format at 1080p. Then upload to your platform of choice (YouTube, Instagram, etc.) with a good title, tags, and description.
Best Video Filming Practices for Beginners Working from Home
Keep it Simple
Don’t overcomplicate your scene. One clean frame, good lighting, and clean audio often outperform “flashy” effects.
Frame at Mid-Chest or Eye Level
For talking-heads, frame the shot from mid-chest up. Keep your eyes 1/3 from the top of the screen. It looks natural and professional.
Don’t Waste Time on Gear You Don’t Use
Focus on the one camera, one mic, one light setup. Add more later as needed. Avoid getting stuck in gear upgrades early on.
Do Test Runs
Always record a 30-second test before filming full-length content. Check lighting, framing, and sound.
Common Home Videography Mistakes and How to Avoid Them
❌ Mistake 1: Shooting Against a Bright Window
Backlighting makes your face dark and the background overexposed. Always light your face more than your background.
✅ Fix: Block backlight or use soft fill light to balance.
❌ Mistake 2: Relying on Laptop Webcam + Built-In Mic
Laptop cams are wide-angle and often grainy. Built-in mics are far from your mouth, picking up room echo.
✅ Fix: Use a standalone camera like the VM20 + a USB condenser mic like AM25X.
❌ Mistake 3: Not Planning the Shoot
Recording without a plan leads to lots of filler footage and lost time in editing.
✅ Fix: Use a simple script or bullet outline for smoother takes.
❌ Mistake 4: Messy Backgrounds
Your cluttered desk or laundry pile pulls attention from your message.
✅ Fix: Clean or crop your frame; add depth with lighting and simple props.
Upgrade Your Home Filmmaking with NearStream
Looking to enhance your home video quality without overcomplicating your setup? Nearstream’s YouTube Streaming Solutions are tailor-made for creators who want simplicity and professional results — right from home.
Their kit features the VM20 streaming camera, known for its sharp 1080p image and low-light performance, and the AM25X condenser microphone, which captures clean, rich audio with ease.