


Discover how to design engaging and effective video editing classes online. This guide explores course planning, delivery platforms, student engagement, and how to build a professional-looking teaching setup that enhances your virtual classroom.
Why Now Is the Right Time to Learn Video Editing Online
Content Creation Is Now a Universal Skill
Video editing is no longer just for filmmakers. Today’s students need it for school presentations, marketing portfolios, or launching their own YouTube channels. Online classes lower the barrier to entry, allowing self-paced learning for diverse audiences.
Education Institutions Are Expanding Digital Course Offerings
According to HolonIQ’s 2023 report on global education investment, digital course content and video-centric skill programs are among the fastest-growing segments in K–12 and higher education (HolonIQ Report 2023). Schools offering video editing classes online are more likely to attract tech-forward learners.

How to Design an Effective Online Video Editing Course
Before choosing software and recording tools, educators should clarify learning outcomes. Do you want students to:
- Edit interviews with clear transitions?
- Create social media-ready short videos?
- Build long-form documentary projects?
Define the skills, then map each to a weekly module.
Platform Considerations
Choose a learning platform that supports:
- Video playback + file submission (e.g., Google Classroom, Moodle)
- Discussion threads for critiques (e.g., Canvas)
- Live demos via Zoom or Microsoft Teams
For free options, educators can explore YouTube (unlisted playlists), Vimeo, or platforms like Skillshare/Teachable if monetizing is a goal.
Recommended Course Structure (Beginner Level)
| Week | Topic | Tools Required |
|---|---|---|
| 1 | Intro to Editing Concepts | None |
| 2 | Using Editing Software (e.g. CapCut) | CapCut / DaVinci Resolve |
| 3 | Cutting & Sequencing | Screen Recording + Slides |
| 4 | Adding Music & Sound Effects | Audio Library Access |
| 5 | Titles, Transitions, Motion Graphics | Sample Assets |
| 6 | Color Correction & Exporting | Color Grading Presets |
Bonus: Offer “Free Online Video Editing Courses” as Entry Points
Many institutions offer 1–2 sample lessons to attract students. These can be shared on YouTube with an invite to join the full online video editing course.
Creating Your Online Video Teaching Setup
Even the best-designed course fails without proper audio-visual delivery. Let’s break down what you need.
Video Camera Equipment: Clarity Matters
When recording lessons or livestreaming tutorials, a camera that captures facial expressions and screen interactions in high resolution improves trust and engagement.
- Use a dedicated webcam with HDMI output for dual-use recording
- Mount it at eye-level using a boom arm or monitor stand
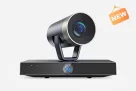
💡 PodKit Solo by NearStream offers USB/HDMI dual streaming, ideal for screen + face capture while recording software tutorials.
Suggested Image Keyword: "teaching camera setup"
Lighting: Make Your Teaching Space Look Professional
Don’t underestimate lighting—it affects attention and credibility.
Use three-point lighting:
- Key Light: main light from the front side
- Fill Light: softer light to reduce shadows
- Back Light: adds depth, separates subject from background
💡 The VK40 Lighting Kit includes remote dimming, soft light, and green screen to simulate a clean studio even from your living room.

Suggested Image Keyword: "three-point lighting diagram"
Audio: Teaching Without Echoes
Muffled or echoey audio is the #1 complaint from online learners. Prioritize:
- Condenser mics for seated voiceovers
- Wireless mics if demonstrating while moving
Platform tip: Use OBS or StreamYard to sync audio and screen sharing seamlessly.
Suggested Image Keyword: "online teaching audio mic setup"
Tips for Boosting Engagement in Online Classes for Video Editing
Use Multicam or Screen + Face Layouts
Let students see both your screen and your face—this keeps the experience human.
Suggested Image Keyword: "dual video layout editing class"
Offer Downloadable Practice Materials
Short clips, sound files, and poorly edited samples can give students hands-on material to work with.
Include Peer Review Assignments
Have students review each other’s work using shared drives or LMS folders. This mimics industry workflows.
Go Live Occasionally
Run optional live sessions for feedback or project reviews using your video equipment. Helps build community.
Suggested Image Keyword: "virtual classroom video editing"
People Also Ask (FAQ)
Q1: What’s the best software for teaching video editing online?
Start with free tools like CapCut, Shotcut, or DaVinci Resolve. For advanced users, Adobe Premiere Pro.
Q2: Do I need professional equipment to teach?
Not at first. But stable lighting and a good mic go a long way in student comprehension. Kits like PodKit Solo simplify setup.
Q3: Can students learn editing without installing apps?
Yes. Web-based tools like Canva Video, Clipchamp, or VEED.io offer browser-based editing.
Final Thoughts: Create Learning, Not Just Content
Online video editing lessons should be about more than software walkthroughs. Focus on story structure, audio pacing, and critique sessions. With the right mix of planning and simple video recording equipment, your remote classroom can inspire the next generation of creators.