


You have built the ultimate gaming rig, yet your stream still stutters during intense gunfights. Why? Because asking one computer to render AAA games and encode video simultaneously creates inevitable bottlenecks.
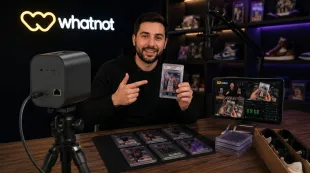
The solution used by top esports pros is the Dual PC Streaming Setup. By separating gaming from broadcasting, you unlock maximum FPS and studio-quality video. In this guide, we will show you exactly how to set up game streaming on pc using two rigs and why the NearStream capture card is the essential bridge to professional streaming.
Common Mistakes When Learning How to Set Up Game Streaming on PC
Many beginners search for how to set up game streaming on pc and assume the answer is simply "Download OBS and click Go Live." While this works for casual use, it introduces a massive performance tax known as Resource Contention.
The CPU/GPU Tug-of-War
When you play a modern title like Cyberpunk 2077, your GPU is working at 99% capacity. When you stream on the same machine, OBS fights for those same resources to compress video data.
- If you prioritize the Game: OBS starves, causing "skipped frames" (laggy stream).
- If you prioritize the Stream: Your game throttles. You experience increased Input Lag. In competitive gaming, even 10ms of added input lag can be the difference between a headshot and a respawn screen.
The "1% Low" Problem
Average FPS lies. Single PC streaming destroys your 1% Lows—these are the momentary stutters that happen during explosions or fast camera spins. These micro-stutters ruin your aim, even if the FPS counter looks high.
Mastering the Architecture of a Dual PC Streaming Setup
To eliminate these bottlenecks, you need to physically separate the workload. A professional dual pc streaming setup consists of three distinct parts:
- The Gaming PC: Dedicated 100% to running the game. It outputs video and audio via HDMI, unaware that it is being recorded. It retains full performance.
- The Streaming PC: Dedicated 100% to production. It runs OBS, chatbots, music, and handles the heavy video encoding (x264 or NVENC).
- The Bridge: The connection between them. This is where most people get confused. You cannot just use a USB cable; you need a dedicated video pipeline.
Why You Need a Capture Card for Dual PC Streaming
The most critical component in this ecosystem is the hardware bridge. You need a specific capture card for dual pc streaming to take the HDMI signal from your Gaming PC and feed it into your Streaming PC.
If you choose the wrong card, you will ruin your gaming experience.
The Refresh Rate Trap
Most budget capture cards are limited to 60Hz.
- The Scenario: You have a $500 gaming monitor capable of 240Hz. You plug in a cheap capture card.
- The Result: Your powerful Gaming PC detects the capture card's limit and forces your monitor down to 60Hz. You have instantly lost your competitive advantage just to stream.
You need a card that supports High Refresh Rate Passthrough. This brings us to the optimal hardware choice.

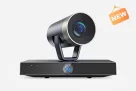
Why NearStream is the Best Capture Card for Pros
When building a high-end setup, NearStream stands out as the best capture card for dual PC configurations. It is engineered specifically to solve the "Refresh Rate Trap."
1. 144Hz / 240Hz Passthrough
NearStream cards feature an advanced EDID controller that supports High Frame Rate (HFR) loop-out.
- How it works: Your Gaming PC sends a 144Hz signal into the NearStream Input.
- Output A (To Monitor): Sends the full 144Hz signal to your eyes. Zero latency.
- Output B (To Stream): Internally downscales the signal to 1080p 60fps for Twitch.
- The Benefit: You play smooth; your viewers watch clear. No compromises.
2. Uncompressed YUY2 Video
Streaming requires clean data. Many USB 2.0 cards compress video into MJPEG format, resulting in "muddy" pixelation during fast motion. NearStream utilizes USB 3.0 to send Uncompressed YUY2 video. This delivers a raw, razor-sharp image to your Streaming PC.
3. Thermal Reliability
Streams can last 8+ hours. Plastic cards overheat and freeze. NearStream uses an aerospace-grade aluminum alloy chassis to dissipate heat, ensuring rock-solid stability during marathon sessions.
NDI vs. HDMI Capture Card: Which is Better?
Budget-conscious streamers often ask: "Why buy an hdmi capture card when I can use NDI to send video over my network for free?"
NDI (Network Device Interface) is powerful, but for gaming, hardware beats software.
1. Network Congestion
NDI relies on your router. A high-quality stream consumes 150Mbps+ of local bandwidth. If a family member downloads a file, your NDI stream will stutter or disconnect. An hdmi capture card like NearStream uses a dedicated cable, creating an air-gapped, interference-free connection.
2. Encoding Overhead
NDI requires your Gaming PC to use 5-10% of its GPU/CPU to package the video before sending it. NearStream acts like a "dumb monitor," requiring 0% resources from your Gaming PC.
The Audio Nightmare: Syncing Sound in a Dual PC Setup
Connecting video is easy; audio is hard. When you plug in HDMI, Windows often cuts audio to your headphones. Here is the professional fix using VoiceMeeter Banana.
- Install VoiceMeeter Banana: On your Gaming PC.
- Set Defaults: Set "VoiceMeeter Input" as your Default Playback Device.
- Output A1 (Headphones): Select your gaming headset inside VoiceMeeter.
- Output A2 (Capture Card): Select NVIDIA High Definition Audio (or NearStream).
- The Result: VoiceMeeter duplicates the audio instantly. One copy goes to your ears, one goes down the HDMI cable to the Streaming PC.

The Ultimate OBS Settings for the Streaming PC
Now that your Streaming PC is receiving pristine video from NearStream, push your settings to the limit.
Recommended "Pro" Presets:
- Resolution: 1920x1080
- Frame Rate: 60 FPS
- Encoder:
- Powerful CPU: x264 (Preset: Medium/Slow).
- NVIDIA GPU: NVIDIA NVENC H.264 (New).
- Bitrate: 6000 Kbps (Twitch) / 10000+ Kbps (YouTube).
- Keyframe Interval: 2 Seconds.
- Video Format (Source): Set NearStream source to YUY2 and Color Space to 709.
Troubleshooting Your Setup
Table 2: Dual PC Troubleshooting Matrix
| Problem | Likely Cause | Rapid Fix |
|---|---|---|
| Screen Tearing on Stream | Hz Mismatch | Cap Gaming PC FPS to a multiple of 60, or use OBS Limit Capture Framerate. |
| No Audio on Stream | VoiceMeeter | Check VoiceMeeter A2 (HDMI) is active and green. |
| "No Signal" in OBS | HDCP | Turn off HDCP if capturing consoles. Check HDMI cables. |
| Washed Out Colors | Color Range | In OBS Source settings, change Color Range to Full. |
| Buzzing Audio | Ground Loop | Use a Ground Loop Isolator for 3.5mm audio connections. |
Conclusion
Moving to a dual pc streaming setup is the moment a hobbyist becomes a professional. It removes the hardware limitations that hold back your gameplay and your broadcast quality.
But remember, the system is only as strong as its weakest link. Do not bottle-neck your high-end rig with a budget card. By choosing NearStream—with its high refresh rate passthrough and uncompressed capture—you ensure that your experience is fluid, your aim is true, and your stream looks immaculate.
FAQ: Frequently Asked Questions
Q1: Do I need a powerful GPU for the Streaming PC?
A: No. Since it isn't running the game, a mid-range GPU (like a GTX 1660) or even a decent CPU handles 1080p encoding perfectly.
Q2: Can NearStream capture 1440p?
A: Yes. NearStream supports 1440p input and passthrough, automatically downscaling to 1080p for the stream.
Q3: Does passthrough add input lag?
A: No. The NearStream HDMI Loop-out is a physical split. There is zero added latency to your gaming monitor.
Q4: How do I hear alerts (Follows/Subs) if I wear headphones on the Gaming PC?
A: You can run a simple Aux cable from the Streaming PC "Line Out" back to the Gaming PC "Line In" and listen to "Line In" via Windows settings.
Q5: What cables are included?
A: NearStream comes with the necessary USB 3.0 cable. You just need two high-quality HDMI cables.