


You just did it. A perfect 3-stock comeback in Smash Ultimate. You wipe the entire enemy team in Splatoon 3. You hold down the capture button on your Joy-Con, buzzing with triumph... and you get a 30-second, 720p clip that misses the best part.
Sound familiar? For years, this has been the single biggest frustration for every Nintendo Switch content creator. You have the skill, but your console is holding you back. You see the pros on Twitch with their crisp, full-screen gameplay, facecams, and alerts. The one piece of gear that bridges the gap between your 30-second clip and their professional broadcast is a Nintendo Switch capture card.
This isn't just a hobby; it's a massive opportunity. The(https://market.us/report/game-streaming-services-market/). With Nintendo reporting over 128 million "annual playing users" , the audience is there. A switch capture card is your key to that kingdom, and with modern solutions like the NearStream CCD30, getting a professional setup has never been easier.
We get it, you're busy. You've got games to play. If you just want the best, here are our top picks for capturing your Switch gameplay.
- The Pro's Choice & Best Value: NearStream CCD30
- The Legacy Favorite: Elgato HD60 X
- The Internal (PCIe) Option: AVerMedia Live Gamer 4K (GC573)
Why You Absolutely Need a Capture Card for Your Switch
Let's get one thing straight: if you are serious about creating content from your Nintendo Switch, a capture card switch is not optional. It is essential. Here’s why.
Beyond the 30-Second Limit: Taking Control of Your Content
The built-in recording feature on the Switch is a fun gimmick, not a creative tool. It's limited to 30 seconds of 720p footage, and the quality is heavily compressed.
A capture card bypasses this limit entirely. It records the direct HDMI signal coming out of your Switch dock. This means you can record hours of pristine 1080p or even 4K footage at a high bitrate. Want to record your entire 3-hour Zelda: Tears of the Kingdom session to edit down later? No problem. Want to create a 20-minute, high-quality "Best Of" montage for YouTube? This is the only way to do it.
Unlocking Your "Stream Persona": Overlays, Alerts, and Facecams
This is the real magic. A capture card turns your Switch gameplay into a "video source" inside your streaming software, like OBS Studio or Streamlabs.
Once your Switch is a source, it's just one element on a digital canvas. You can now add all the other building blocks of a professional stream:
- Your Facecam: Add your webcam as another source and put your face in the corner.
- Overlays: Add your custom-branded borders, "Starting Soon," and "Be Right Back" screens.
- Alerts: Connect to your streaming platform to show flashy, on-screen alerts for new followers, subscribers, and donations.
- Chat Box: Display your Twitch or YouTube chat on-screen so your audience feels included.
Without a capture card, this is simply impossible. You're not just streaming your game; you're producing a show.
A Quick Note: Does This Work for the Nintendo Switch Lite?
This is a question we get all the time, so let's be crystal clear: No, a capture card will not work with a Nintendo Switch Lite.
The reason is simple. The Switch Lite is a handheld-only device. It lacks the internal hardware to output a video signal. The USB-C port on the bottom is only for charging.
A capture card needs to receive a video signal via an HDMI cable, which is something only the standard Nintendo Switch (and OLED model) can provide when it's placed in the official dock.
How to Choose the Best Capture Card for Your Switch Setup
Okay, you're convinced. But searching for a capture card for switch reveals a confusing mess of technical specs. Let's break down what actually matters for a Switch streamer.
The Big Question: 1080p vs. 4K? (Aka "Future-Proofing")
You might be thinking, "But my current Switch only outputs 1080p! Why would I pay for a 4K capture card?"
That's a smart question, but it's 2025. Buying a 1080p-only card today is a massive mistake for two big reasons:
- Future-Proofing: The Nintendo Switch 2 is here, and it's a 4K powerhouse. The moment you upgrade your console, your 1080p capture card will become obsolete, forcing you to buy another one. Buying a 4K card today means you're ready for the next generation of Nintendo and you can use it to capture your PS5 or Xbox Series X.
- Passthrough: Even if you stream at 1080p, you might own a 4K monitor. A 4K-capable card allows for 4K passthrough, letting you play your game in beautiful, crisp 4K while your stream sees a high-quality 1080p version.
The Most Important Spec: What is "Zero-Lag Passthrough"?
This is the single most important feature you need.
Here's the scenario: a capture card takes time to process the video signal and send it to your PC. If you try to play your game by looking at the preview window in OBS, you'll feel a tiny, maddening delay. We call this "latency."
In a game like Animal Crossing, who cares? But in Super Smash Bros. Ultimate, Splatoon 3, or any fast-paced action game, this half-second delay is unplayable. Your brain will tell you to jump, but your character won't jump for another half-second.
"Zero-Lag Passthrough" (sometimes called "HDMI Out") solves this. It's a second HDMI port on the capture card that splits the signal before processing it. This "passthrough" signal is sent directly to your gaming monitor or TV with virtually zero lag (sub-1ms).
The Result: You play your game perfectly on your monitor, with the instant responsiveness you're used to, while your PC handles the capture "behind the scenes." Do not, under any circumstances, buy a card without this.

Capture Resolution vs. Passthrough Resolution (Don't Get Confused!)
This is a marketing trap that catches everyone. You'll see a card that screams "4K60" all over the box. Read the fine print.
- Passthrough Resolution: This is what you see on your gaming monitor. You want this to be high (e.g., 4K @ 60fps) for that lag-free experience we just talked about.
- Capture Resolution: This is what your audience sees and what your PC records. This is the signal sent over USB.
The trap? Many popular cards advertise "4K60 Passthrough" but only offer "4K30 Capture." 30fps (frames per second) looks choppy for fast-paced Switch games. Your audience won't be seeing the smooth 60fps gameplay that you are. You want a card where these two numbers match.
External (Plug-and-Play) vs. Internal (PCIe) Cards
This is a simple choice based on your computer.
- External Capture Cards: These are small boxes that connect to your computer via a USB cable.
- Pros: Incredibly easy to use (plug-and-play), portable, and they work with laptops.
- Cons: They use up USB bandwidth on your computer.
- Internal Capture Cards: These are cards that you install directly into a PCIe slot on your desktop computer's motherboard (like a graphics card).
- Pros: Extremely fast, low-latency capture, and they don't use any external USB ports.
- Cons: They only work in desktop PCs and require you to be comfortable opening your computer to install it.
For 99% of streamers, a high-quality external USB card is the perfect, simple solution.
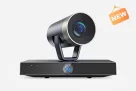
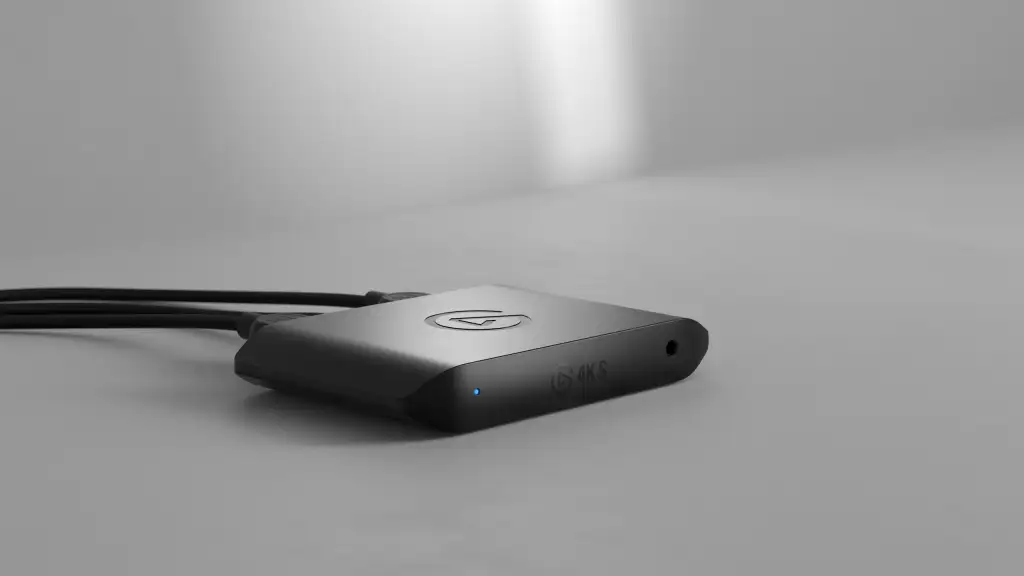
Product Spotlight: The NearStream CCD30
Now that you know what to look for, let's talk about why we've picked the NearStream CCD30 as our top choice. Simply put, it's the card that was built to solve all of these modern streaming problems without compromise. It’s the card we wished we had when we started.
The CCD30's killer feature is what we call the "Holy Trinity" for creators: 4K60 Passthrough, 4K60 Capture, and a 3.5mm Audio Port. While other popular cards force you to compromise—making you choose between playing in 4K60 but only streaming at 4K30—the CCD30 lets you have it all. Its 4K@60fps HDMI loop-out gives you that perfect, zero-lag gaming experience on your monitor. At the same time, its USB-C 3.1 connection delivers a true 4K@60fps capture feed to your PC. Your audience sees exactly what you see, in stunning, smooth clarity.

But the real secret weapon for Switch streamers is the 3.5mm audio interface. Ask any streamer what their biggest headache is, and they'll say "audio." Getting your game sound, your mic, and your Discord chat to all play nicely in OBS is a nightmare. The CCD30 simplifies this. You can plug your microphone or headset directly into the card for a clear, rich audio feed without the complex software routing. It even supports HDR10, so your Switch 2 gameplay will look vibrant and rich, not gray and "washed out."
It’s the ultimate plug-and-play solution. There are no drivers to install on Windows or Mac. It’s a next-gen streaming solution that delivers pro-level specs without the "pro-level" budget, making it the perfect and most logical choice for anyone serious about streaming their Switch.
The Best Capture Cards for Nintendo Switch in 2025
Let's break down our top picks and why one stands clearly above the rest.
1. NearStream CCD30 (Best Overall & Best Value)
Our Verdict: This is the clear winner for 99% of Switch and Switch 2 streamers. It's one of the only external cards in its class that offers the "holy trinity": 4K60 Passthrough, 4K60 Capture, and a dedicated 3.5mm audio port. It’s the most powerful, most user-friendly, and most future-proof option, period.
- Passthrough: 4K @ 60fps (HDR10)
- Capture (USB-C 3.1): 4K @ 60fps / 1080p @ 60fps
- Audio: 3.5mm Audio Input
- Type: External
2. Elgato HD60 X (Legacy Favorite)
Our Verdict: The HD60 X is a reliable and solid card from the biggest name in the game. It was the industry standard for a long time. Its 4K60 HDR passthrough and VRR support are excellent, but it's now dated by its 4K30 capture limit. This makes it a poor "future-proof" choice for the 4K60-capable Switch 2, as your recordings will be half the framerate of your gameplay.
- Passthrough: 4K @ 60fps (HDR10), 1440p @ 120fps (VRR)
- Capture (USB 3.0): 4K @ 30fps, 1080p @ 60fps (HDR)
- Audio: 3.5mm Analog Audio In
- Type: External
3. AVerMedia Live Gamer 4K (GC573) (Best Internal Option)
Our Verdict: If you are a desktop-only power user and are comfortable opening your PC, an internal card is a total beast. The GC573 is a powerhouse, capturing 4K60 HDR and high refresh rates with near-zero capture latency. It's a fantastic piece of tech, but it's overkill for a Switch and isn't an option for laptop users.
- Passthrough: 4K @ 60fps (HDR), 1440p @ 144fps, 1080p @ 240fps
- Capture: 4K @ 60fps (HDR), 1440p @ 144fps, 1080p @ 240fps
- Audio: HDMI 2.0 (LPCM 5.1/7.1 passthrough)
- Type: Internal (PCIe Gen 2 x4)

4. Elgato 4K X (The "Overkill" Option)
Our Verdict: This is Elgato's newest external card, designed to compete with 4K60-capable cards like the CCD30. It's a great device, but it's built for high-refresh-rate PC and PS5/Xbox gaming. Its main features (HDMI 2.1, 4K144 passthrough) are completely unused by the Nintendo Switch 2, which is capped at 4K60. You're paying a premium for specs you simply don't need.
- Passthrough: 4K @ 144fps (HDR/VRR)
- Capture (USB 3.2 Gen2): 4K @ 60fps
- Audio: 3.5mm Analog Audio In
- Type: External
How to Stream Your Nintendo Switch: A 5-Minute Setup Guide
You've got your card. Let's get you live. It's shockingly easy and takes less than five minutes.
What You'll Need (The Checklist)
- Nintendo Switch (Standard or OLED, not the Lite)
- Nintendo Switch Dock
- Your Capture Card (e.g., NearStream CCD30)
- Two (2) HDMI cables
- One (1) USB-C cable (usually included with the card)
- A streaming PC or laptop (Mac or Windows)
- OBS Studio (It's free, and it's what everyone uses)
Step 1: Connect the Hardware (The "HDMI Sandwich")
We'll make this foolproof. Just follow the signal path.
- Put your Nintendo Switch into the Dock.
- Plug HDMI Cable #1 from the Switch Dock (HDMI OUT) into your Capture Card (HDMI IN).
- Plug HDMI Cable #2 from your Capture Card (HDMI OUT) into your TV or Gaming Monitor. (This is your lag-free passthrough!)
- Plug the USB-C Cable from your Capture Card into a high-speed USB 3.0 port on your PC (it's the blue-colored one).
That's it. The hardware is done.
Step 2: Set Up OBS (Adding Your "Video Capture Device")
- Open OBS Studio. In the "Sources" panel at the bottom, click the "+" button.
- Select "Video Capture Device" from the menu.
- A new window will pop up. Name it something obvious, like "Nintendo Switch," and click OK.
- Another window will appear. In the "Device" dropdown menu, select your capture card (e.g., "NearStream CCD30").
- Success! You should see your Nintendo Switch home screen pop up in the OBS preview window.
Step 3: Getting Your Audio (The Tricky Part, Made Easy)
By default, you'll see your game, but you won't hear it on your PC. This is the #1 place new streamers get stuck.
- The Easy Way (with NearStream CCD30): Plug your headset or mic right into the 3.5mm port on the card. Done. The audio is now part of the capture feed.
- The OBS Way (for other cards):
- In the OBS "Audio Mixer" panel, you'll see a new audio meter for "Nintendo Switch."
- Click the three-dots icon on that audio source and select "Advanced Audio Properties."
- Find your "Nintendo Switch" source in the list.
- Change the "Audio Monitoring" dropdown from "Monitor Off" to "Monitor and Output."
This setting does two things: "Monitor" means you can hear the game audio in your PC headset. "Output" means your stream can hear it. You've just routed your game audio!
Your First Stream: Fixing Common Switch Streaming Problems
You're so close! But then you hit a snag. Don't panic. 99% of all streaming issues are one of these three things.
"Help! I just see a black screen in OBS!"
This is the most common problem. Don't worry.
- Fix 1: Your cables are in the wrong order. This is the problem 90% of the time. Double-check your "HDMI Sandwich." The cable from the Switch Dock must go into the HDMI IN port. The cable to your Monitor must come from the HDMI OUT port.
- Fix 2: Your Switch is asleep or not docked properly. Make sure the little green light on the dock is on.
- Fix 3 (Laptop Users): Your PC is trying to be "efficient" and isn't giving OBS enough power. Right-click the OBS Studio icon and select "Run as administrator." This often fixes it.
"My stream can't hear my game (or I can't)!"
- Fix 1: You missed Step 3 in the audio setup. Go back to OBS, find your "Nintendo Switch" source in the Advanced Audio Properties, and set it to "Monitor and Output."
- Fix 2: If that doesn't work, OBS might be confused about where to find the audio. Right-click your "Nintendo Switch" source, go to Properties, and scroll all the way down. Check the box that says "Use Custom Audio Device" and select your capture card from the dropdown menu.
"Why do my game colors look gray or 'washed out'?"
- Cause: This is an HDR-to-SDR (High Dynamic Range to Standard Dynamic Range) mismatch. Your new Switch 2 (or PS5) is sending a beautiful, vibrant HDR signal, but OBS is an SDR program by default, so it doesn't know how to read it. The result is a dull, gray, or "washed out" image.
- The Easy Fix: Go into your Switch 2's System Settings -> TV Settings and turn HDR Output to "Off." This forces a standard (SDR) signal that OBS can easily understand, and your colors will instantly look correct.
- The Pro Fix: In OBS, right-click your "Video Capture Device" source and go to Properties. Set the "Video Format" to P010 and the "Color Space" to Rec. 2100 (PQ). This is more advanced, but it tells OBS how to correctly "tone map" the HDR signal.
Ready to Go Pro? Your Audience is Waiting.
You've made it. You've gone from a frustrated gamer with a folder full of 30-second clips to a confident creator who understands the hardware, the software, and the strategy.
You now know that the only thing standing between you and a professional-looking stream is a single, one-time investment. The audience is out there, waiting for the next big Smash Bros. or Mario Kart streamer.
The choice is clear. Don't buy a 1080p card that's already obsolete. Don't buy a 4K30 card that will bottleneck your new Switch 2 and show your audience a choppy_mess.
The NearStream CCD30 is the smartest, most future-proof, and most user-friendly choice to remove that final barrier. It's the only card that perfectly matches the 4K60 power of the new console and solves the audio nightmare with its 3.5mm port.
Stop dreaming about streaming and start doing it. Your journey begins with the right gear.
Frequently Asked Questions (FAQ)
Q: Do capture cards cause input lag on the Nintendo Switch?
A: No, as long as you use the "HDMI Passthrough" port. Playing by looking only at the OBS preview window will have noticeable lag. But playing on a separate monitor connected to the "HDMI Out" port will have virtually zero lag, even for competitive games.
Q: Do I need a 4K capture card for the original 1080p Switch?
A: You don't need one for the original Switch, but it is highly recommended. A 4K card "future-proofs" your setup for the 4K-capable Nintendo Switch 2 and also allows you to capture from other modern consoles like the PS5 or Xbox Series X.
Q: Can I stream from a Nintendo Switch Lite?
A: Unfortunately, no. The Nintendo Switch Lite is a handheld-only device and does not have the internal hardware to output a video signal via HDMI, which is required for all capture cards.
Q: What's the difference between capture and passthrough?
A: "Passthrough" is the video signal the card sends directly to your gaming monitor for you to play on (this should be lag-free). "Capture" is the video signal the card processes and sends to your computer for OBS to record or stream.
Q: Why does my Switch screen go black in OBS when I plug it in?
A: This is almost always due to incorrect cabling. Make sure your Switch Dock's HDMI cable is plugged into the "HDMI IN" port on your capture card, and your TV/monitor is plugged into the "HDMI OUT" port.


