


What Does a Capture Card Do? The Ultimate Guide for Streamers (2025)
You're live. The chat is popping. You’re in the final boss fight, seconds away from a no-hit run. You pull off the final parry, the boss explodes... but your chat just sees a frozen screen and a spinning wheel. A few seconds later, the stream catches up, but the moment is gone. Your viewers type "lag," "RIP stream," or worse, they just... leave.
This is the creator's nightmare. It’s that moment when your gaming PC, which you love, simply cannot handle two massive jobs at once: 1) running a beautiful game at max settings, and 2) simultaneously capturing, encoding, and uploading that gameplay to the internet. Your GPU usage hits 100%, your CPU chokes, and your stream or your game suffers.
This technical problem is a direct barrier to your goals. The creator dream is real, but the competition is intense. The global game streaming market is set to hit $86.54 billion by 2034, and with(URL), production quality is no longer optional. Viewers have no patience for a poor-quality stream.
The pros aren't fighting this battle. They use a secret weapon: a game capture card. This one piece of hardware is the key to protecting your quality and unlocking a professional stream. It’s the tool that offloads all that heavy lifting, and modern solutions like the NearStream CCD30 are making this elite, 4K-ready technology accessible to every creator.
Our Quick Picks for 2025
- NearStream CCD30 (Best Overall): Our top pick for the perfect blend of 4K60 HDR passthrough, 4K capture, ultra-low latency, and a game-changing 3.5mm audio port.
- Elgato 4K X (Premium 4K144 Option): A powerhouse for high-refresh-rate PC gamers, offering 4K144 passthrough and capture.
- AVerMedia Live Gamer Ultra 2.1 (HDMI 2.1 Pick): A strong choice for PS5/Xbox owners who need HDMI 2.1 to play at 4K@120Hz.
So, What Does a Capture Card Do? (The ELI5 Version)
Let's keep it simple. A capture card is a small piece of hardware that acts like a specialized translator for your computer.
Think of your PS5, Xbox, or DSLR camera. It outputs a beautiful, high-speed video signal through an HDMI cable. Your computer, however, doesn't know what to do with that raw HDMI signal. It’s like someone is speaking a different language.
The capture card "listens" to the HDMI signal, translates it into a format your computer recognizes (like a standard webcam), and sends it over a simple USB cable.
This brings us to the "Aha!" moment: offloading the work.
When you stream from a single PC, your computer's brain (CPU) and graphics card (GPU) are doing everything. They are running the game, capturing the screen, encoding the video, and running OBS, Discord, and everything else. This is what causes the dreaded "Encoding Lag!" warning in OBS.
A capture card offloads the "capturing" and "converting" part of the job. It's a dedicated specialist with its own processor built for one job. This frees up your PC's resources to focus on running your game smoothly and encoding your stream, resulting in a lag-free experience for both you and your audience.
This is what separates a real capture card from a cheap, $20 "HDMI-to-USB adapter." That cheap adapter is just a "passive" plug—it forces your computer's CPU to do all the conversion work, often making the lag worse. A capture card is an active device with a processor that does before it ever gets to your CPU.

What is a Game Capture Card For? (Hint: It's Not Just for Consoles)
A capture card is the "key" that unlocks new, higher-quality sources for your stream. These are the three main "level-ups" every creator aims for.
Use Case #1: Flawless Console Streaming (The Classic)
This is the most common reason to get a capture card. Sure, you can stream from your PS5 or Xbox directly, but the built-in apps are basic, buggy, and give you zero control. You can't add your professional overlays, your custom alerts, your facecam, or any part of your brand.
A capture card lets you pull your console gameplay (PS5, Xbox, Nintendo Switch) into your PC. This allows you to run your stream through powerful software like OBS or Streamlabs. You get full control over your brand, your alerts, and your quality, treating your console gameplay like any other professional PC stream.
Use Case #2: The Pro-Level "Dual PC" Setup
Ever wonder how top-tier competitive streamers play Warzone or VALORANT at 300+ FPS while simultaneously broadcasting a crystal-clear 1080p60 stream? They're using a "dual PC" setup.
Here's how it works:
- Gaming PC: This computer does nothing but run the game at maximum, uncompromised frame rates.
- Streaming PC: This second computer does nothing but run OBS and handle 100% of the encoding and streaming load.
The capture card is the essential bridge that connects them. The HDMI output from the Gaming PC's graphics card goes into the capture card on the Streaming PC. This setup guarantees zero performance impact on your gaming rig, giving you the best of both worlds.
Use Case #3: Making Your DSLR or Mirrorless Camera a Pro Webcam
This is, without a doubt, the single biggest leap in production value you can make.
You know those streamers with the crystal-clear facecam and that beautiful, blurred background (known as "bokeh")? They aren't using a $50 webcam, even a "nice" one. They are using a high-end DSLR or mirrorless camera, like a Sony a6000.
But you can't just plug a $1,000 camera into your PC's USB port and have it work. Your PC won't understand the signal. A capture card (either a dedicated one or a versatile game capture card) takes that camera's "Clean HDMI" output and translates it into a standard webcam feed that OBS and Discord can instantly recognize.
"But Do I Really Need a Capture Card for PC Streaming?"
This is the #1 question we get, so let's be 100% clear.
If you are only streaming PC games on a single, powerful PC—especially one with a modern NVIDIA (20, 30, or 40-series) or AMD graphics card—you might not need a capture card.
Your NVIDIA (NVENC) or AMD (AMF) graphics card has a dedicated encoding chip built-in. This chip is separate from the part of your GPU that runs the game. Software like OBS ("Game Capture") or NVIDIA's Shadowplay can use this dedicated chip to capture and encode your stream with a very low performance impact.
In fact, trying to use a capture card to "capture yourself" on a single PC is a bad idea. It's overly complicated and can actually add latency and use more resources. For a single-PC stream, always use "Game Capture" or "Window Capture" in OBS.
So, when do you need one for a PC stream?
- When Your Game Eats 100% of Your GPU: Some games are just monsters. Titles like Warzone, Cyberpunk 2077, or Star Citizen can max out even a powerful GPU, leaving no resources for OBS to do its job. This causes skipped frames and stream lag.
- The Real Reason: When You Want to Add More. The second you want to add any of the three use cases we just talked about—a console, a DSLR camera, or a second PC—you must have a capture card.
The question isn't "Do I need this for my PC?" The real question is, "What do I want to add to my PC stream to make it better?" The answer (a PS5, a better camera) always requires a capture card.
The Magic of "Zero-Lag Passthrough" Explained
This is the single most important feature for a console streamer. If you get a card without this, you've wasted your money.
In the old days, capture cards had a terrible delay. You'd hit the "jump" button on your controller, and your character would jump on the stream preview window a full second later. This "latency" made playing fast-paced games impossible.
Modern capture cards solve this with a feature called "Passthrough" (or "HDMI Out").
Think of your capture card as a smart HDMI splitter.
- Signal 1 (Passthrough): The HDMI signal comes in from your PS5, and a perfect, untouched, "zero-lag" copy goes out the "HDMI Out" port directly to your gaming monitor or TV. You play on this signal. It feels exactly like the card isn't even there.
- Signal 2 (Capture): At the exact same time, the card takes a second copy of that signal, processes it, and sends it over USB to your streaming PC.
This is the magic. It's the "best of both worlds." You can play your game in its full, native glory—like 4K 120Hz HDR with VRR on your PS5—while your stream simultaneously receives a clean 4K30 or 1080p60 signal optimized for Twitch.
You never have to sacrifice your own gaming experience for your audience.
External Capture Card vs. Internal: Which Is Right for You?
This is the next big decision. Both devices do the same job, but they live in different places.
The Plug-and-Play Hero: External Capture Card
This is what most streamers use. It’s a small box that sits on your desk and connects to your PC via a USB 3.0 or USB-C cable.
- Pros:
- Easy Setup: You just plug it in. No tools, no opening your PC.
- Portable: You can easily move it between a desktop and a laptop.
- Laptop Friendly: This is the only choice for laptop streamers.
- Cons:
- It's another box and more cables on your desk.
- A high-speed USB port is required.
Best for: 90% of streamers, laptop users, and anyone who values convenience and flexibility.
The "Set It and Forget It" Powerhouse: Internal Capture Card
This is a card (like a small graphics card) that you install directly into a PCIe slot on your desktop's motherboard.
- Pros:
- Clean Setup: It's inside your PC. No desk clutter, no extra power or USB cables.
- Lowest Latency: A direct connection to the motherboard's PCIe bus is the fastest possible, with no USB overhead.
- Cons:
- Desktop Only: Will not work with a laptop.
- Installation: You have to be comfortable opening your PC case.
- Less Flexible: You can't just grab it and take it to a friend's house.
Best for: Dedicated desktop users, tech-savvy streamers, and "clean setup" enthusiasts who never stream from a laptop.
Honestly, the "latency" debate is mostly a thing of the past. Modern external cards using USB 3.1 and 3.2 are so fast that the difference is unnoticeable. The real choice is just convenience (external) vs. a clean build (internal). For most people, are the clear winner.
How to Use a Capture Card (A 5-Minute Setup Guide)
Okay, you bought one. Let's get it running. It's way easier than you think. We'll use an external capture card and OBS Studio as our example, since it's the most common setup.
Step 1: The Physical Connection (The "HDMI Sandwich")
- Plug an HDMI cable from your console (PS5, Xbox, Switch dock) into the "HDMI IN" port on your capture card.
- Plug a second HDMI cable from the "HDMI OUT" (Passthrough) port on your capture card into your gaming monitor or TV.
- Plug the USB-C (or USB 3.0) cable from the capture card into a high-speed USB port on your streaming PC.
That's it. Your monitor should turn on and show your game.
Step 2: Critical Console Setting (Disable HDCP!)
This is the "secret step" that frustrates new creators. Before your card will see a signal, you must disable HDCP (High-bandwidth Digital Content Protection). This is the copy protection that blocks capture of movies and protected apps.
- On PS5/PS4: Go to Settings > System > HDMI and uncheck "Enable HDCP".
- On Xbox: This is handled automatically.
- On Nintendo Switch: The dock does not use HDCP for games, so you're good to go!
If you skip this step, you will just get a black screen in OBS.
Step 3: Adding Your Card to OBS Studio
- Open OBS Studio on your streaming PC.
- Look at the "Sources" panel (usually at the bottom).
- Click the "+" icon and select "Video Capture Device" from the menu.
- A new window will pop up. Give it a name (like "PS5 Capture") and click OK.
- In the next properties window, click the "Device" dropdown menu.
- You should see your capture card listed (e.g., "NearStream CCD30," "Elgato 4K X," etc.). Select it.
- Your game footage should instantly appear in the preview. Click OK.
You're done! You can now resize that source, add your facecam and overlays, and go live.
The Best Capture Cards for Creators in 2025
Choosing a card can be confusing. The two specs that matter most are Max Passthrough (what you see and play on) and Max Capture (what your stream sees).
Here's a breakdown of our top picks to help you decide.
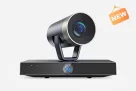
1. NearStream CCD30 (Best Overall)
- Max Passthrough: 4K at 60Hz with HDR10
- Max Capture: 4K at 60Hz (MJPG format), 4K at 30fps (I420 format)
- Connection: USB-C 3.1
- Key Features: Ultra-low latency, 3.5mm audio input, Plug and Play (no drivers).
Why We Love It: This is the "sweet spot" for 99% of creators. It delivers the pro-level 4K60 HDR passthrough you need for your PS5 or Xbox, while also capturing a pristine 4K signal for your stream. But its killer feature is the 3.5mm audio interface. This solves the biggest headache of streaming: audio. You can plug your mic or a headset directly into the card to simplify your entire setup. It's the most power and the most "problem-solving" features for the price.

2. Elgato 4K X (Premium 4K144 Option)
- Max Passthrough: 4K at 144Hz with HDR10 & VRR
- Max Capture: 4K at 144Hz
- Connection: USB 3.2 Gen 2 (10Gbps)
- Key Features: HDMI 2.1, full 4K144 capture.
Our Take: This is the "Ferrari" of capture cards. If you are a top-tier PC gamer with a 240Hz monitor and need to capture in 4K144, this is your (very expensive) card. It's honestly overkill for anyone streaming to Twitch, but it is a future-proof beast.
3. AVerMedia Live Gamer Ultra 2.1 (GC553G2)
- Max Passthrough: 4K at 144Hz with HDR & VRR
- Max Capture: 4K at 60Hz
- Connection: USB 3.2 Gen 2 (10Gbps)
- Key Features: HDMI 2.1, 4-pole headset/gamepad jacks, RGB lighting.
Our Take: A direct competitor to Elgato and a fantastic choice for next-gen console owners. The HDMI 2.1 passthrough means you can play at 4K@120Hz on your TV while capturing at a rock-solid 4K60. It also has great audio support, though some users report its 4K HDR capture is limited to 30fps.
4. Razer Ripsaw HD (Best 1080p Entry-Level)
- Max Passthrough: 4K at 60Hz
- Max Capture: 1080p at 60Hz
- Connection: USB 3.0
- Key Features: Audio mix-in capabilities.
Our Take: This is a great starter card. It lets you play in 4K, but stream at 1080p60 (which is the gold standard for Twitch anyway). Its main drawback is the reported lack of HDR passthrough, which is a big deal for PS5/Xbox players who want that full visual pop on their own screen.
Product Spotlight: The NearStream CCD30
For years, choosing a capture card felt like a compromise. You either got a "budget" card that only captured 1080p, forcing you to sacrifice stream quality. Or, you had to jump to an "extreme" card that cost a fortune and had complicated features you'd never use. "Pro-level" always meant "complicated and expensive." The NearStream CCD30 was designed to shatter that compromise.
This card is built on one idea: you shouldn't have to be a tech engineer to have a professional stream. It gives you the full, breathtaking 4K60 HDR passthrough you demand for your next-gen console, so your own gaming experience is perfect. But it also delivers stunning 4K capture (up to 60fps MJPG / 30fps I420), all over a simple, fast USB-C 3.1 connection. Add in true "Plug and Play" operation on Windows and Mac (no drivers needed) and an ultra-low latency chip, and you have the new standard for 4K streaming.
But its real unique selling proposition is the integrated 3.5mm audio interface. Ask any streamer what the hardest part of setup is, and they'll say "audio." How do you get your standalone mic into the stream? How do you add commentary? The CCD30 solves this. It allows you to connect your microphone or headset directly to the card, simplifying your audio setup, eliminating sync issues, and getting your voice into the stream with zero hassle. It's a small detail that solves one of the biggest streaming headaches.
Conclusion: Stop Fighting Your PC, Start Building Your Audience
A capture card isn't just a piece of hardware; it's an investment in your stream's quality, your audience's experience, and your own peace of mind. It’s the tool that stops the resource war inside your PC and lets you focus on what you actually do best: creating, entertaining, and building your community.
You're competing with millions of other streamers. The first impression is everything. Don't let lag or a blurry webcam be the reason a new viewer clicks away. If you're ready to make the leap to a professional-grade stream, you don't have to compromise.
Capture Card FAQ (Frequently Asked Questions)
Q1: Does a capture card reduce lag or increase FPS?
A: It stops your stream from causing your game to lag by "offloading" the capture work. It doesn't magically increase your in-game FPS, but it protects your FPS from the heavy load of streaming.
Q2: Can I use a capture card with a Mac?
A: Yes! Most external USB capture cards (like the NearStream CCD30) are "UVC" or "Plug and Play," meaning they work on macOS right out of the box with OBS. Internal PCIe cards are for Windows PCs only.
Q3: What's the difference between a capture card and a cheap HDMI-to-USB adapter?
A: A cheap adapter is "passive"—it just changes the plug shape and forces your PC to do the work. A capture card is an active device with its own internal processor to properly convert and process a high-bandwidth video signal.
Q4: Do I need a capture card to record my gameplay?
A: For PC gaming, you can use software like OBS or Shadowplay. For console gaming, a capture card is by far the best way to record high-quality, long-form footage, as the built-in recording is very limited.
Q5: What is HDCP and why does it block my console?
A: HDCP is copy protection on HDMI to block recording of movies and apps. You must disable it in your PS5/PS4/Xbox settings (in the 'System' menu) before your capture card will see the signal.


